点击查看更新记录
更新记录
2022-03-04:插件版v1.0.0发布
- 发布插件版1.0.0
- 通过调用pjax.loadURL()方法实现不间断跳转
- 兼容Aplayer全局吸底音乐
2021-01-31:正式版v4.1.1
- 新增butterfly_v3.6.0提示
2021-01-20:正式版v4.1
- 篇数图标使用fontawesome的Unicode实现伪类显示图标
2021-01-06:正式版v4.0
- 完全重构教程内容。可以看做全新的磁贴教程。
- 使用纯CSS仿写原版磁贴样式。
- 无需引入任何额外js。
- 完美支持pjax。
- 自动获取分类和文章数。
- 自定义配置行数。可选三列还是四列。
- 磁贴只显示一级分类。
- 自定义配置磁贴封面及描述。
2021-01-06:内测版v3.2
- 增加配置项,可选是否开启单行显示。
2020-12-19:内测版v3.1
- 基于冰老师的磁贴方案进行修改(1.0和2.0为冰老师编写)
- 修改了样式,转为styl
- 磁贴信息不再自动获取,转为手动填写
- 无需再引入jquery或者vue
- 适配pjax
- 增加配置项,可选宽屏模式下是1行4列还是1行3列
点击查看参考教程
| 参考方向 | 教程原贴 |
|---|---|
| 沿用样式 | 教程:基于Butterfly主题的分类磁贴2.0版 |
写在最前
本项目是对冰卡诺老师写的教程:基于Butterfly主题的分类磁贴2.0版进行重构,去除了所有繁杂的引入js的过程,所以也就无需引入jquery和vue,也完美支持pjax。当前4.0版本可以自动获取分类及文章数。封面和描述配置项直接嵌入配置文件。支持自定义行数,超过自动切换为滚动显示。可选择三列或四列显示。
插件版配置教程
插件版教程
安装插件,在博客根目录
[Blogroot]下打开终端,运行以下指令:1
npm install hexo-butterfly-categories-card --save
添加配置信息,以下为写法示例
在站点配置文件_config.yml或者主题配置文件_config.butterfly.yml中添加1
2
3
4
5
6
7
8
9
10
11
12
13
14
15
16
17
18
19
20
21
22
23
24
25
26# hexo-butterfly-categories-card
# see https://akilar.top/posts/a9131002/
categoryBar:
enable: true # 开关
priority: 5 #过滤器优先权
enable_page: / # 应用页面
layout: # 挂载容器类型
type: id
name: recent-posts
index: 0
column: odd # odd:3列 | even:4列
row: 1 #显示行数,默认两行,超过行数切换为滚动显示
message:
- descr: Ubuntu指南
cover: https://npm.elemecdn.com/akilar-candyassets/image/cover1.webp
- descr: 玩转Win10
cover: https://npm.elemecdn.com/akilar-candyassets/image/cover2.webp
- descr: 长篇小说连载
cover: https://npm.elemecdn.com/akilar-candyassets/image/cover3.webp
- descr: 个人日记
cover: https://npm.elemecdn.com/akilar-candyassets/image/cover4.webp
- descr: 诗词歌赋
cover: https://npm.elemecdn.com/akilar-candyassets/image/cover5.webp
- descr: 杂谈教程
cover: https://npm.elemecdn.com/akilar-candyassets/image/cover6.webp
custom_css: https://npm.elemecdn.com/hexo-butterfly-categories-card@1.0.0/lib/categorybar.css- 参数释义
| 参数 | 备选值/类型 | 释义 |
|---|---|---|
| priority | number | 【可选】过滤器优先级,数值越小,执行越早,默认为10,选填 |
| enable | true/false | 【必选】控制开关 |
| enable_page | path/all | 【可选】填写想要应用的页面的相对路径(即路由地址),如根目录就填’/‘,分类页面就填’/categories/‘。若要应用于所有页面,就填’all’,默认为’/‘ |
| layout.type | id/class | 【可选】挂载容器类型,填写id或class,不填则默认为id |
| layout.name | text | 【必选】挂载容器名称 |
| layout.index | 0和正整数 | 【可选】前提是layout.type为class,因为同一页面可能有多个class,此项用来确认究竟排在第几个顺位 |
| column | odd/even | 【可选】显示列数,考虑到比例问题,只提供3列和4列,odd为3列, even为4列 |
| row | number | 【可选】显示行数,默认两行,超过行数切换为滚动显示 |
| message.descr | text | 分类描述,需要和你自己的文章分类一一对应。 |
| message.cover | url | 分类背景,需要和你自己的文章分类一一对应。 |
| custom_css | url | 【可选】自定义样式,会替换默认的css链接,可以下载文档给出的cdn链接后自主修改 |
4.0磁贴新版教程
旧版教程
修改
[Blogroot]\themes\butterfly\layout\index.pug1
2
3
4
5
6
7
8
9
10extends includes/layout.pug
block content
include ./includes/mixins/post-ui.pug
#recent-posts.recent-posts
+ if theme.categoryBar.enable
+ .recent-post-item(style='height:auto;width:100%;padding:0px;')
+ #categoryBar!= list_categories(site.categories,{class: 'categoryBar',depth: 1})
+postUI
include includes/pagination.pug为了整体美观,如果你还添加了其他首页魔改,需要调整卡片之间的间隔。此处以
gitcalendar为例。需要添加margin-top:20px;样式属性。(也可能不需要,视实际情况添加该属性)1
2
3
4
5
6
7
8
9
10
11
12extends includes/layout.pug
block content
include ./includes/mixins/post-ui.pug
#recent-posts.recent-posts
.recent-post-item(style='width:100%')
!=partial('includes/custom/gitcalendar', {}, {cache:theme.fragment_cache})
+ if theme.categoryBar.enable
+ .recent-post-item(style='height:auto;width:100%;padding:0px;margin-top:20px;')
+ #categoryBar!= list_categories(site.categories,{class: 'categoryBar',depth: 1})
+postUI
include includes/pagination.pug新建
[Blogroot]\themes\butterfly\source\css\_layout\categoryBar.styl1
2
3
4
5
6
7
8
9
10
11
12
13
14
15
16
17
18
19
20
21
22
23
24
25
26
27
28
29
30
31
32
33
34
35
36
37
38
39
40
41
42
43
44
45
46
47
48
49
50
51
52
53
54
55
56
57
58
59
60
61
62
63
64
65
66
67
68
69
70
71
72
73
74
75
76
77
78
79
80
81
82
83
84
85
86
87
88
89
90
91
92
93
94
95
96
97
98
99
100if hexo-config('categoryBar.enable')
#categoryBar
width 100%
ul
&.categoryBar-list
margin 5px 5px 0 5px
padding 0
li
&.categoryBar-list-item
font-weight bold
display inline-block
height 180px
margin 5px .5% 0 .5%
background-image linear-gradient(rgba(0, 0, 0, 0.4) 25%, rgba(16, 16, 16, 0) 100%)
border-radius 10px
padding 25px 0 25px 25px
box-shadow rgba(50, 50, 50, 0.3) 50px 50px 50px 50px inset
overflow hidden
background-size 100%
background-position center
&:hover
background-size 110%
box-shadow inset 500px 50px 50px 50px rgba(50,50,50, 0.6)
span
&.categoryBar-list-count
&::after
transition all .5s
transform translate(-100%, 0)
a
&.categoryBar-list-link
color white
font-size 20px
&::before
content '|'
color white
font-size 20px
&:after
content ''
position relative
width 0
bottom 0
display block
height 3px
border-radius 3px
background-color white
&:hover
&:after
width 90%
left 1%
transition all 0.5s
span
&.categoryBar-list-count
display block
color white
font-size 20px
&::before
content '\f02d'
padding-right 15px
@extend .fontawesomeIcon
&::after
padding 5px
display block
color white
font-size 20px
position relative
right -100%
covers = hexo-config('categoryBar.cover')
for cover,i in covers
li.categoryBar-list-item:nth-child({i+1})
background unquote(cover)
descrs = hexo-config('categoryBar.descr')
for descr,i in descrs
li.categoryBar-list-item:nth-child({i+1})>span::after
content descr
if hexo-config('categoryBar.column') == 'odd'
li
&.categoryBar-list-item
width 32.3%
else if hexo-config('categoryBar.column') == 'even'
li
&.categoryBar-list-item
width 24%
@media screen and (max-width: 650px)
li
&.categoryBar-list-item
width 48%!important
height 150px!important
margin 5px 1% 0 1%!important
$caterow = hexo-config('categoryBar.row')?hexo-config('categoryBar.row'):2
.categoryBar-list
max-height 190px * $caterow
overflow auto
&::-webkit-scrollbar
width 0!important
@media screen and (max-width: 650px)
.categoryBar-list
max-height 160px * $caterow- 在
[Blogroot]\_config.butterfly.yml添加配置项:1
2
3
4
5
6
7
8
9
10
11
12
13
14
15
16
17
18categoryBar:
enable: true
column: odd # 显示列数,odd:3列 | even:4列
row: 1 #显示行数,默认两行,超过行数切换为滚动显示
descr:
- 长篇小说连载
- 杂谈教程
- 玩转Win10
- Ubuntu指南
- 个人日记
- 诗词歌赋
cover:
- url('https://npm.elemecdn.com/akilar-candyassets/image/cover1.webp')
- '#abcdef' # HEX格式色值需要用''包裹,不然会被识别成注释
- rgba(45,67,89,0.7)
- linear-gradient(rgba(0, 0, 0, 0.4) 25%, rgba(200,16 , 16, 0) 100%)
- url('https://npm.elemecdn.com/akilar-candyassets/image/cover5.webp')
- url('https://npm.elemecdn.com/akilar-candyassets/image/cover6.webp')
| 参数名 | 可选参数 | 参数释义 |
|---|---|---|
| enable | true、false | 必填项。控制磁贴开关,true为开启,false为关闭 |
| colume | odd、even | 必填项。控制磁贴显示列数,odd为3列,even为4列 |
| raw | 1、2、3…(大于0的整数即可) | 选填项,默认显示两行。控制磁贴显示行数,超过自动切换为滚动显示。 |
| descr | string格式,任意字符串均可 | 选填项,默认为空。磁贴描述,根据磁贴从左到右,从上到下的顺序配置。每行用-开头,如果要跳着填写,前一行需要留空。 |
| cover | - url('/img/cover.png')- '#abcdef'- rgba(45,67,89,0.7)- linear-gradient(rgba(0, 0, 0, 0.4) 25%, rgba(200,16 , 16, 0) 100%) | 选填项,默认深蓝色渐变背景。磁贴封面,根据磁贴从左到右,从上到下的顺序配置。可以配置纯色、渐变色、图片,如果要跳着填写,前一行需要留空。 |
3.0磁贴旧版内容
旧版教程需要手动填写,不建议使用
在
[Blogroot]\themes\butterfly\layout\includes\目录下新建catalogMagnet.pug1
2
3
4
5
6
7
8
9
10
11
12
13
14
15#catalogMagnet
if site.data.magnet
each ci in site.data.magnet
figure.gallery-group.color-card
img.gallery-group-img.loaded(src=url_for(ci.cover) alt='' data-ll-status='loaded')
figcaption
.gallery-group-name.magnetname
span |
a(href=url_for(ci.link))= ci.name
li.category-list-item
span.category-list-count
i.fas.fa-book
span= ci.count
p= ci.descr
a(href=url_for(ci.link))在
[Blogroot]\themes\butterfly\source\css\_layout\目录下新建catalogMagnet.styl1
2
3
4
5
6
7
8
9
10
11
12
13
14
15
16
17
18
19
20
21
22
23
24
25
26
27
28
29
30
31
32
33
34
35
36
37
38
39
40
41
42
43
44
45
46
47
48
49
50
51
52
53
54
55
56
57
58
59
60if hexo-config('catalogMagnet.enable')
#catalogMagnet
.category-list-count
font-weight bold
&:after
content ' 篇'
.fa-book
padding-right 5px
.category-list-item
list-style-type none
figure
&.gallery-group
p
font-weight bold
if hexo-config('catalogMagnet.style') == 'odd'
.color-card
width: 32.3%
height: 180px
margin: 5px 0.5%
else if hexo-config('catalogMagnet.style') == 'even'
.color-card
width: 24%
height: 180px
margin: 5px 0.5%
@media screen and (max-width: 650px)
.color-card
width: 48%!important
height: 150px!important
margin: 0.3rem 1%!important
.magnetname:after
background white!important
figure
.gallery-group
&.color-card
box-shadow rgba(50, 50, 50, 0.4) 3px 3px 18px 0px inset
figcaption
background-image linear-gradient(rgba(0, 0, 0, 0.4) 25%, rgba(16, 16, 16, 0) 100%)
color white
padding 0.8rem
& > figure
& > figcaption
& > div
& > a
& > span
color white
font-size 1rem!important
if hexo-config('catalogMagnet.max-height')
div#catalogMagnet
max-height 190px
overflow auto
&::-webkit-scrollbar
width 0!important
@media screen and (max-width: 650px)
div#catalogMagnet
max-height 160px修改
[Blogroot]\themes\butterfly\layout\index.pug,添加磁贴卡片,注意butterfly_v3.6.0取消了缓存配置,转为完全默认,需要将{cache:theme.fragment_cache}改为{cache: true}:1
2
3
4
5
6
7
8
9
10extends includes/layout.pug
block content
include ./includes/mixins/post-ui.pug
#recent-posts.recent-posts
+ if theme.catalogMagnet.enable
+ .recent-post-item.photo-tag(style='width:100%;height:auto;float:left;padding:5px;flex-wrap:wrap;justify-content : center;flex-direction: row;')
+ !=partial('includes/catalogMagnet', {}, {cache:theme.fragment_cache})
+postUI
include includes/pagination.pug为了整体美观,如果你还添加了其他首页魔改,需要调整卡片之间的间隔。此处以
gitcalendar为例。需要添加margin-top:20px;样式属性。1
2
3
4
5
6
7
8
9
10
11
12extends includes/layout.pug
block content
include ./includes/mixins/post-ui.pug
#recent-posts.recent-posts
.recent-post-item(style='width:100%')
!=partial('includes/gitcalendar', {}, {cache:theme.fragment_cache})
if theme.catalogMagnet.enable
.recent-post-item.photo-tag(style='width:100%;height:auto;float:left;padding:5px;flex-wrap:wrap;justify-content : center;flex-direction: row;margin-bottom:20px; margin-top:20px;')
!=partial('includes/catalogMagnet', {}, {cache:theme.fragment_cache})
+postUI
include includes/pagination.pug新建
[Blogroot]\source\_data\magnet.yml,没有_data文件夹就自行新建。在magnet.yml中填写磁贴信息。1
2
3
4
5
6
7
8
9
10
11- name: 磁贴名称
link: 磁贴链接(站内链接填写相对链接)
cover: 磁贴背景图片
descr: 磁贴描述
count: 分类文章数目
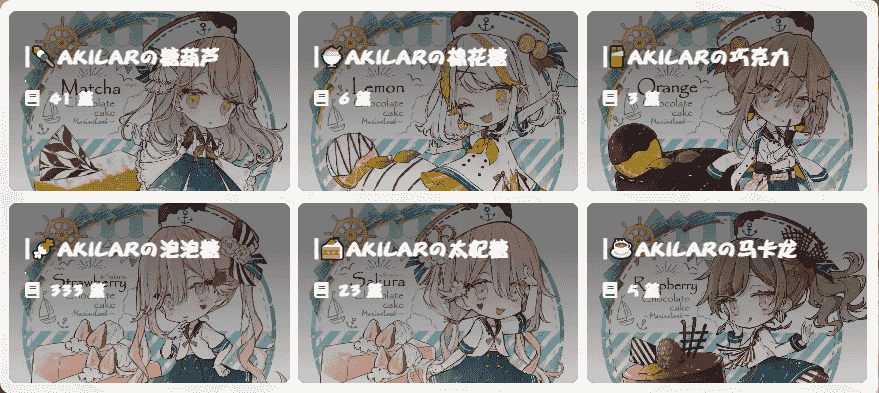
# 示例
- name: 🍡Akilarの糖葫芦
link: /categories/%F0%9F%8D%A1Akilar%E3%81%AE%E7%B3%96%E8%91%AB%E8%8A%A6/
cover: https://npm.elemecdn.com/akilar-candyassets/image/cover2.webp
descr: 杂谈及教程
count: 45修改
[Blogroot]\_config.butterfly.yml,添加磁贴配置项1
2
3
4catalogMagnet:
enable: true
style: odd # 磁贴每行显示数量:odd:3列 | even:4列
max-height: true #单行显示,超过则转为滚动显示hexo cl && hexo g之后就能看到磁贴效果了。
TO DO
重构磁贴方案
新增配置项控制,支持两种样式
pjax适配
去jquery,vue
重写list_categories()方法直接生成磁贴样式
编制插件版

Use this card to join the candyhome and participate in a pleasant discussion together .
Welcome to Akilar's candyhome,wish you a nice day .