点开查看开发记录
开发记录
2024-03-20:正式版v1.10
- 新增一个友链卡片样式。
- 感谢@白夜 | byer.top同学分享的样式,所以新样式我要以“byer”来命名。
2022-03-02:正式版v1.9
- 调整样式布局存放位置。
- 修复灯箱插件强制套壳的问题。
- 修复flexcard导致gallery外挂标签图片偏移的问题。
2021-08-09:正式版v1.8
- 补丁样式作用域调整,修复对
gallery标签的影响。
2021-08-09:正式版v1.7.3
- 补丁样式作用域调整,修复对
gallery标签的影响。
2021-03-23:正式版v1.7.2
- 追加可能出现的BUG解决方案,修复对
gallery标签的影响。 - 新增提示语,最新版已经不需要半自动截图项目。
2021-02-07:正式版v1.7.1
- 追加可能出现的BUG解决方案,针对
flexcard风格提供适配样式表
2021-02-04:正式版v1.7
- 新增默认站点截图,
siteshot配置项留空的情况下,使用thum.io提供的API自动截图。修改flink.pugvolantis样式:1
2
3
4
5
6
7
8.img
+ - var siteshot = item.siteshot ? url_for(item.siteshot) : 'https://image.thum.io/get/width/400/crop/800/allowJPG/wait/20/noanimate/' + item.link
if theme.lazyload.enable
- img(data-lazy-src=url_for(item.siteshot) onerror=`this.onerror=null;this.src='` + url_for(theme.error_img.post_page) + `'` alt='' )
+ img(data-lazy-src=siteshot onerror=`this.onerror=null;this.src='` + url_for(theme.error_img.post_page) + `'` alt='' )
else
- img(src=url_for(item.siteshot) onerror=`this.onerror=null;this.src='` + url_for(theme.error_img.flink) + `'` alt='' )
+ img(src=siteshot onerror=`this.onerror=null;this.src='` + url_for(theme.error_img.post_page) + `'` alt='' )flexcard样式:1
2
3
4
5
6
7
8.wrapper.cover
+ - var siteshot = item.siteshot ? url_for(item.siteshot) : 'https://image.thum.io/get/width/400/crop/800/allowJPG/wait/20/noanimate/' + item.link
if theme.lazyload.enable
- img.cover.fadeIn(data-lazy-src=url_for(item.siteshot) onerror=`this.onerror=null;this.src='` + url_for(theme.error_img.post_page) + `'` alt='' )
+ img.cover.fadeIn(data-lazy-src=siteshot onerror=`this.onerror=null;this.src='` + url_for(theme.error_img.post_page) + `'` alt='' )
else
- img.cover.fadeIn(src=url_for(item.siteshot) onerror=`this.onerror=null;this.src='` + url_for(theme.error_img.flink) + `'` alt='' )
+ img.cover.fadeIn(src=siteshot onerror=`this.onerror=null;this.src='` + url_for(theme.error_img.post_page) + `'` alt='' )
点开查看参考内容
参考内容
| 参考内容 | 教程原帖 |
|---|---|
| 友链页面生成教程 | |
| site-card样式 |  |
| 自动化友链站点批量截图 | |
| 站点截图API文档 | |
| site-card样式根据issues自动更新 | |
| flink_card样式根据issues自动更新 | |
| flexcard友链样式提取 |

思路解读
Butterfly的友链太过单调了。加上之前正好移植了Volantis的一堆外挂标签样式,突发奇想用Site-card来写友链,效果相当理想。

魔改步骤
- 新建友链页面。已开的可以跳过,从第2步开始.
参照参考教程中的Butterfly友链界面配置教程先配置好默认友链页面。 - 在Hexo博客根目录
[Blogroot]下打开终端,输入hexo new page link。1
hexo new page link
打开
[Blogroot]\source\link\index.md,添加一行type: 'link':1
2
3
4
5---
title: link
date: 2020-12-01 22:19:45
type: 'link'
---- 新建文件
[Blogroot]\source\_data\link.yml,没有_data文件夹的话也请自己新建。以下是默认友链格式示例(自己写的教程,夹带点私货不过分吧,嘻嘻)。打开[Blogroot]\source\_data\link.yml,输入:1
2
3
4
5
6
7- class_name: 糖果屋のVIP
class_desc: 售后服务享五折优惠2333
link_list:
- name: Akilar
link: https://akilar.top
avatar: /img/siteicon/favicon.png
descr: 欢迎光临糖果屋 取消
[Blogroot]\_config.butterfly.yml中menu配置项内link页面的注释。1
2
3
4
5
6
7
8
9
10menu:
Home: / || fas fa-home
Archives: /archives/ || fas fa-archive
Tags: /tags/ || fas fa-tags
Categories: /categories/ || fas fa-folder-open
# List||fas fa-list:
# - Music || /music/ || fas fa-music
# - Movie || /movies/ || fas fa-video
Link: /link/ || fas fa-link
# About: /about/ || fas fa-heart修改
[Blogroot]\themes\butterfly\layout\includes\page\flink.pug,此处添加判断机制,使得可以通过修改配置文件来切换友链风格。同时为了方便管理,把各个友链样式放到新建的文件目录[Blogroot]\themes\butterfly\layout\includes\page\flink_style下。修改
[Blogroot]\themes\butterfly\layout\includes\page\flink.pug,全部内容替换为:1
2
3
4
5
6
7
8
9case theme.flink_style
when 'volantis'
include ./flink_style/volantis.pug
when 'flexcard'
include ./flink_style/flexcard.pug
when 'byer'
include ./flink_style/byer.pug
default
include ./flink_style/butterfly.pug新建
[Blogroot]\themes\butterfly\layout\includes\page\flink_style\butterfly.pug1
2
3
4
5
6
7
8
9
10
11
12
13
14
15
16
17
18
19#article-container
if top_img === false
h1.page-title= page.title
.flink
if site.data.link
each i in site.data.link
if i.class_name
h2!= i.class_name
if i.class_desc
.flink-desc!=i.class_desc
.flink-list
each item in i.link_list
.flink-list-item
a(href=url_for(item.link) title=item.name target="_blank")
.flink-item-icon
img.no-lightbox(src=url_for(item.avatar) onerror=`this.onerror=null;this.src='` + url_for(theme.error_img.flink) + `'` alt=item.name )
.flink-item-name= item.name
.flink-item-desc(title=item.descr)= item.descr
!= page.content新建
[Blogroot]\themes\butterfly\layout\includes\page\flink_style\volantis.pug1
2
3
4
5
6
7
8
9
10
11
12
13
14
15
16
17
18
19
20
21#article-container
if top_img === false
h1.page-title= page.title
.flink
if site.data.link
each i in site.data.link
if i.class_name
h2!= i.class_name
if i.class_desc
.flink-desc!=i.class_desc
.site-card-group
each item in i.link_list
a.site-card(target='_blank' rel='noopener' href=url_for(item.link))
.img
- var siteshot = item.siteshot ? url_for(item.siteshot) : 'https://image.thum.io/get/width/400/crop/800/allowJPG/wait/20/noanimate/' + item.link
img.no-lightbox(src=siteshot onerror=`this.onerror=null;this.src='` + url_for(theme.error_img.post_page) + `'` alt='' )
.info
img.no-lightbox(src=url_for(item.avatar) onerror=`this.onerror=null;this.src='` + url_for(theme.error_img.flink) + `'` alt='' )
span.title= item.name
span.desc(title=item.descr)= item.descr
!= page.content新建
[Blogroot]\themes\butterfly\layout\includes\page\flink_style\flexcard.pug1
2
3
4
5
6
7
8
9
10
11
12
13
14
15
16
17
18
19
20#article-container
if top_img === false
h1.page-title= page.title
.flink
if site.data.link
each i in site.data.link
if i.class_name
h2!= i.class_name
if i.class_desc
.flink-desc!=i.class_desc
.flink-list
each item in i.link_list
a.flink-list-card(href=url_for(item.link) target='_blank' data-title=item.descr)
.wrapper.cover
- var siteshot = item.siteshot ? url_for(item.siteshot) : 'https://image.thum.io/get/width/400/crop/800/allowJPG/wait/20/noanimate/' + item.link
img.no-lightbox.cover.fadeIn(src=siteshot onerror=`this.onerror=null;this.src='` + url_for(theme.error_img.post_page) + `'` alt='' )
.info
img.no-lightbox(src=url_for(item.avatar) onerror=`this.onerror=null;this.src='` + url_for(theme.error_img.flink) + `'` alt='' )
span.flink-sitename= item.name
!= page.content新建
[Blogroot]\themes\butterfly\layout\includes\page\flink_style\byer.pug1
2
3
4
5
6
7
8
9
10
11
12
13
14
15
16
17
18
19
20
21
22
23
24#article-container
.flink
if site.data.link
each i in site.data.link
if i.class_name
h2!= i.class_name
if i.class_desc
.flink-desc!=i.class_desc
.flink-list
each item in i.link_list
.flink-list-item
a(href=url_for(item.link) title=item.name target="_blank")
.flink-item-bar
sapn.flink-item-bar-yellow
sapn.flink-item-bar-green
sapn.flink-item-bar-red
sapn.flink-item-bar-x +
.flink-item-content
.flink-item-text
.flink-item-name= item.name
.flink-item-desc(title=item.descr)= item.descr
.flink-item-icon
img.no-lightbox(src=url_for(item.avatar) onerror=`this.onerror=null;this.src='` + url_for(theme.error_img.flink) + `'` alt=item.name )
!= page.content修改
[Blogroot]\themes\butterfly\source\css\_page\flink.styl,同理,将样式文件也放到新建的[Blogroot]\themes\butterfly\source\css\_flink_style目录下方便管理。修改
[Blogroot]\themes\butterfly\source\css\_page\flink.styl1
2
3
4
5
6
7
8if hexo-config('flink_style') == 'butterfly'
@import './_flink_style/butterfly'
else if hexo-config('flink_style') == 'volantis'
@import './_flink_style/volantis'
else if hexo-config('flink_style') == 'flexcard'
@import './_flink_style/flexcard'
else if hexo-config('flink_style') == 'byer'
@import './_flink_style/byer'新建
[Blogroot]\themes\butterfly\source\css\_flink_style\butterfly.styl1
2
3
4
5
6
7
8
9
10
11
12
13
14
15
16
17
18
19
20
21
22
23
24
25
26
27
28
29
30
31
32
33
34
35
36
37
38
39
40
41
42
43
44
45
46
47
48
49
50
51
52
53
54
55
56
57
58
59
60
61
62
63
64
65
66
67
68
69
70
71
72
73
74
75
76
77
78
79
80
81
82
83
84
85
86
87.flink#article-container
margin-bottom: 20px
.flink-desc
margin: .2rem 0 .5rem
.flink-list
overflow: auto
padding: 10px 10px 0
text-align: center
& > .flink-list-item
position: relative
float: left
overflow: hidden
margin: 15px 7px
width: calc(100% / 3 - 15px)
height: 90px
border-radius: 8px
line-height: 17px
-webkit-transform: translateZ(0)
+maxWidth1024()
width: calc(50% - 15px)
+maxWidth600()
width: calc(100% - 15px)
&:hover
.flink-item-icon
margin-left: -10px
width: 0
&:before
position: absolute
top: 0
right: 0
bottom: 0
left: 0
z-index: -1
background: var(--text-bg-hover)
content: ''
transition: transform .3s ease-out
transform: scale(0)
&:hover:before,
&:focus:before,
&:active:before
transform: scale(1)
a
color: var(--font-color)
text-decoration: none
.flink-item-icon
float: left
overflow: hidden
margin: 15px 10px
width: 60px
height: 60px
border-radius: 35px
transition: width .3s ease-out
img
width: 100%
height: 100%
transition: filter 375ms ease-in .2s, transform .3s
object-fit: cover
.img-alt
display: none
.flink-item-name
@extend .limit-one-line
padding: 16px 10px 0 0
height: 40px
font-weight: bold
font-size: 1.43em
.flink-item-desc
@extend .limit-one-line
padding: 16px 10px 16px 0
height: 50px
font-size: .93em
.flink-name
margin-bottom: 5px
font-weight: bold
font-size: 1.5em新建
[Blogroot]\themes\butterfly\source\css\_flink_style\volantis.styl1
2
3
4
5
6
7
8
9
10
11
12
13
14
15
16
17
18
19
20
21
22
23
24
25
26
27
28
29
30
31
32
33
34
35
36
37
38
39
40
41
42
43
44
45
46
47
48
49
50
51
52
53
54
55
56
57
58
59
60
61
62
63
64
65
66
67
68
69
70
71
72
73
74
75
76
77
78
79trans($time = 0.28s)
transition: all $time ease
-moz-transition: all $time ease
-webkit-transition: all $time ease
-o-transition: all $time ease
.site-card-group
display: flex
flex-wrap: wrap
justify-content: flex-start
margin: -0.5 * 16px
align-items: stretch
.site-card
margin: 16px * 0.5
width: "calc(100% / 4 - %s)" % 16px
@media screen and (min-width: 2048px)
width: "calc(100% / 5 - %s)" % 16px
@media screen and (max-width: 768px)
width: "calc(100% / 3 - %s)" % 16px
@media screen and (max-width: 500px)
width: "calc(100% / 2 - %s)" % 16px
display: block
line-height: 1.4
height 100%
.img
width: 100%
height 120px
@media screen and (max-width: 500px)
height 100px
overflow: hidden
border-radius: 12px * 0.5
box-shadow: 0 1px 2px 0px rgba(0, 0, 0, 0.2)
background: #f6f6f6
img
width: 100%
height 100%
pointer-events:none;
// trans(.75s)
transition: transform 2s ease
object-fit: cover
.info
margin-top: 16px * 0.5
img
width: 32px
height: 32px
pointer-events:none;
border-radius: 16px
float: left
margin-right: 8px
margin-top: 2px
span
display: block
.title
font-weight: 600
font-size: var(--global-font-size)
color: #444
display: -webkit-box
-webkit-box-orient: vertical
overflow: hidden
-webkit-line-clamp: 1
trans()
.desc
font-size: var(--global-font-size)
word-wrap: break-word;
line-height: 1.2
color: #888
display: -webkit-box
-webkit-box-orient: vertical
overflow: hidden
-webkit-line-clamp: 2
.img
trans()
&:hover
.img
box-shadow: 0 4px 8px 0px rgba(0, 0, 0, 0.1), 0 2px 4px 0px rgba(0, 0, 0, 0.1), 0 4px 8px 0px rgba(0, 0, 0, 0.1), 0 8px 16px 0px rgba(0, 0, 0, 0.1)
.info .title
color: #ff5722新建
[Blogroot]\themes\butterfly\source\css\_flink_style\flexcard.styl1
2
3
4
5
6
7
8
9
10
11
12
13
14
15
16
17
18
19
20
21
22
23
24
25
26
27
28
29
30
31
32
33
34
35
36
37
38
39
40
41
42
43
44
45
46
47
48
49
50
51
52
53
54
55
56
57
58
59
60
61
62
63
64
65
66
67
68
69
70
71
72
73
74
75
76
77
78
79
80
81
82
83
84
85
86
87
88
89
90
91
92
93
94
95
96
97
98
99
100
101
102
103
104
105
106
107
108
109
110
111
112
113
114
115
116#article-container img
margin 0 auto
.flink-list
overflow auto
& > a
width calc(25% - 15px)
height 130px
position relative
display block
margin 15px 7px
float left
overflow hidden
border-radius 10px
transition all .3s ease 0s, transform .6s cubic-bezier(.6, .2, .1, 1) 0s
box-shadow 0 14px 38px rgba(0, 0, 0, .08), 0 3px 8px rgba(0, 0, 0, .06)
&:hover
.info
transform translateY(-100%)
.wrapper
img
transform scale(1.2)
&::before
position: fixed
width:inherit
margin:auto
left:0
right:0
top:10%
border-radius: 10px
text-align: center
z-index: 100
content: attr(data-title)
font-size: 20px
color: #fff
padding: 10px
background-color: rgba($theme-color,0.8)
.cover
width 100%
transition transform .5s ease-out
.wrapper
position relative
.fadeIn
animation coverIn .8s ease-out forwards
img
height 130px
pointer-events none
.info
display flex
flex-direction column
justify-content center
align-items center
width 100%
height 100%
overflow hidden
border-radius 3px
background-color hsla(0, 0%, 100%, .7)
transition transform .5s cubic-bezier(.6, .2, .1, 1) 0s
img
position relative
top 22px
width 66px
height 66px
border-radius 50%
box-shadow 0 0 10px rgba(0, 0, 0, .3)
z-index 1
text-align center
pointer-events none
span
padding 20px 10% 60px 10%
font-size 16px
width 100%
text-align center
box-shadow 0 0 10px rgba(0, 0, 0, .3)
background-color hsla(0, 0%, 100%, .7)
color var(--font-color)
white-space nowrap
overflow hidden
text-overflow ellipsis
.flink-list>a .info,
.flink-list>a .wrapper .cover
position absolute
top 0
left 0
@media screen and (max-width:1024px)
.flink-list
& > a
width calc(33.33333% - 15px)
@media screen and (max-width:600px)
.flink-list
& > a
width calc(50% - 15px)
[data-theme=dark]
.flink-list a .info,
.flink-list a .info span
background-color rgba(0, 0, 0, .6)
.flink-list
& > a
&:hover
&:before
background-color: rgba(#121212,0.8);
.justified-gallery > div > img,
.justified-gallery > figure > img,
.justified-gallery > a > a > img,
.justified-gallery > div > a > img,
.justified-gallery > figure > a > img,
.justified-gallery > a > svg,
.justified-gallery > div > svg,
.justified-gallery > figure > svg,
.justified-gallery > a > a > svg,
.justified-gallery > div > a > svg,
.justified-gallery > figure > a > svg
position static新建
[Blogroot]\themes\butterfly\source\css\_flink_style\byer.styl1
2
3
4
5
6
7
8
9
10
11
12
13
14
15
16
17
18
19
20
21
22
23
24
25
26
27
28
29
30
31
32
33
34
35
36
37
38
39
40
41
42
43
44
45
46
47
48
49
50
51
52
53
54
55
56
57
58
59
60
61
62
63
64
65
66
67
68
69
70
71
72
73
74
75
76
77
78
79
80
81
82
83
84
85
86
87
88
89
90
91
92
93
94
95
96
97
98
99
100
101
102
103
104
105
106
107
108
109
110
111
112
113
114
115
116
117
118
119
120
121
122
123
124
125
126#article-container
.flink
margin-bottom: 20px
.flink-list
overflow: auto
padding: 10px 10px 0
text-align: center
& > .flink-list-item
position: relative
float: left
overflow: hidden
margin: 15px 7px
width: calc(100% / 3 - 15px)
height: 120px
border-radius: 2px
line-height: 17px
-webkit-transform: translateZ(0)
border: 1px solid
box-shadow: 3px 3px 1px 1px #fee34c;
+maxWidth1024()
width: calc(50% - 15px)
+maxWidth600()
width: calc(100% - 15px)
a
color: var(--font-color)
text-decoration: none
.flink-item-bar
height: 15px
border-width: 0 0 1px 0
border-style: none none solid none
background: #fde135
display: flex;
align-items: center;
flex-direction: row;
flex-wrap: nowrap;
padding: 0 3px 0 3px
sapn
width: 10px;
height: 10px;
margin: 0 1px 0 1px
border-radius: 50%;
display: block;
border: 1px solid;
display: flex;
align-items: center;
justify-content: flex-start;
&.flink-item-bar-yellow
background: #fde135
&.flink-item-bar-green
background: #249a33
&.flink-item-bar-red
background: #f13b06
&.flink-item-bar-x
background: transparent
border: 0px
margin-left: auto
transform: rotate(45deg);
font-size: 23px;
padding: 0px 0px 6px 0px;
.flink-item-content
display: flex;
height: 105px
flex-direction: row;
align-items: center;
justify-content: space-between;
padding: 0 5px 0 5px;
.flink-item-text
width: 60%;
display: flex;
flex-direction: column;
align-items: center;
.flink-item-name
@extend .limit-one-line
max-width: 100%;
padding: 0px 5px 0px 5px;
margin: 0px 0 6px 0;
height: 50%;
font-weight: bold;
font-size: 1.43em;
border-width: 0 0 7px 0;
border-style: solid;
border-color: #fbf19f;
.flink-item-desc
@extend .limit-one-line
max-width: 100%;
height: 50%;
padding: 5px 5px 5px 5px;
font-size: 0.93em;
position: relative
&:before
content: "";
background: transparent;
display: block;
height: calc(100% - 4px);
width: calc(100% - 4px);
position: absolute;
left: 0;
top: 0;
border-radius: 2px;
border: 1px solid;
clip-path: polygon(0 0, 100% 0, 100% 100%, 95% 100%, 95% 50%, 90% 50%, 90% 100%, 0 100%);
.flink-item-icon
overflow: hidden;
margin: 0px 5px;
width: 70px;
height: 70px;
border: 1px solid;
border-radius: 2px;
transition: width .3s ease-out
box-shadow: 2px 2px 1px 1px #fee34c;
img
width: 50px;
height: 50px;
margin: 9px 9px;
transition: filter 375ms ease-in .2s, transform .3s
object-fit: cover
.img-alt
display: none因为Volantis的site-card比Butterfly的flink-card多出了一个站点缩略图,所以需要再额外添加一条配置项。修改
[Blogroot]\source\_data\link.yml,添加一条名为siteshot的配置项。1
2
3
4
5
6
7
8
9- class_name: 糖果屋のVIP
class_desc: 售后服务享五折优惠2333
link_list:
- name: Akilar
link: https://akilar.top
avatar: /img/siteicon/favicon.png
descr: 欢迎光临糖果屋
siteshot: https://cdn.jsdelivr.net/gh/Akilarlxh/ScreenShot@gh-pages/akilar.top.jpg
# siteshot就是站点缩略图的链接。在
[Blogroot]\_config.butterfly.yml中添加配置项:1
2# 友链样式,butterfly为默认样式,volantis为站点卡片样式,flexcard为弹性卡片样式,byer为粉丝彩蛋!
flink_style: volantis # butterfly | volantis | flexcard | byer站点卡片添加了懒加载和图片失效替换。对应配置项为
[Blogroot]\_config.butterfly.yml中的:1
2
3
4# Replace Broken Images (替換無法顯示的圖片)
error_img:
flink: # 头像失效替换图
post_page: # 站点缩略图- 可能遇到的bug:使用
flexcard样式时,因为全站字体大小配置与本站不一致的关系,可能导致友链卡片的头像位置偏移较大。请读者按照flink.styl里的注释内容自己微调。
站点图片批量半自动截图
该项目的本意是为了弥补因为thum.io参数问题导致图片过大,从而加载较慢的问题。先将其保存下来再使用jsdelivr加速。最新版友链已经将thum.io的api内置,且调整了参数,图片大小缩小了将近40倍。也就不是很依赖于jsdelivr加速了。当然若是秉持能快一点是一点原则的用户,还是可以使用的
半自动截图内容非必要
这里使用的是@ChenYFan大佬的项目,通过调用thum.io提供的接口,配合github action,自动下载站点截图到github中,再配合jsdelivr+github图床来引用图片。
使用方法
首先fork项目到自己的github仓库。此处提供两个。一个是原项目。一个是我自己配置过的项目。区别在于我根据thum.io提供的接口文档修改了参数,使得站点截图较小。(用我自己的站点截图作为示例,两者大小是1.2MB:34KB的程度,缩小了将近40倍。当然清晰度也不可同日而语,酌情选择)
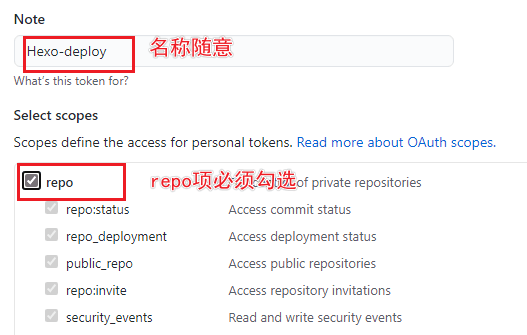
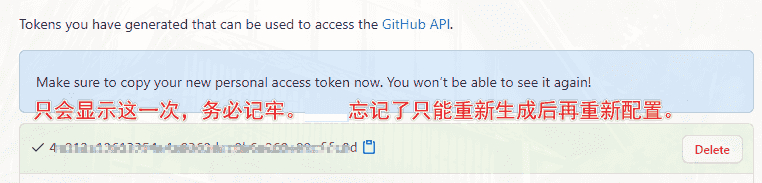
获取Token,(此处直接使用当初为github actions教程准备的配图了)。
访问Github->头像(右上角)->Settings->Developer Settings->Personal access tokens->generate new token,创建的Token名称随意,但必须勾选repo项。token只会显示这一次,之后将无法查看,所以务必保证你已经记录下了Token。之后如果忘记了就只能重新生成重新配置了。
在你fork的项目仓库设置中,新建secrets。变量名为
TOKEN,必须严格大写。首先需要clone项目到本地。
1
git clone git@github.com:[GithubUsername]/ScreenShot.git
然后打开项目中的
ScreenShot\.github\workflows\get.yml,
按照示例添加你的友链地址。1
curl https://image.thum.io/get/width/400/crop/800/allowJPG/wait/20/noanimate/https://<YourDomain>/ -o <YourDoamin>.jpg
记得将
curl https://purge.jsdelivr.net/gh/[GithubUsername]/ScreenShot@gh-pages/*.*中的[GithubUsername]改为你自己的github账号名。之后每次提交就会自动启动github action,将图片下载到
ScreenShot的gh-pages分支。并且通过purge.jsdelivr.net刷新缓存。最后,在友链配置中,就能用
https://cdn.jsdelivr.net/gh/[GithubUsername]/ScreenShot@gh-pages/[friend_link].jpg来引用站点缩略图了。1
2
3
4
5
6
7
8- class_name: 糖果屋のVIP
class_desc: 售后服务享五折优惠2333
link_list:
- name: Akilar
link: https://akilar.top
avatar: /img/siteicon/favicon.png
descr: 欢迎光临糖果屋
siteshot: https://cdn.jsdelivr.net/gh/Akilarlxh/ScreenShot@gh-pages/akilar.top.jpg # 留空则调用API自动截图可能遇到的bug
- 没有启动github action:请到仓库中找到Action,将其打开。
- 图片缓存未刷新:purge.jsdelivr.net的强制刷新也是玄学,这种时候只能等待了。或者手动发布release,然后使用版本号。这个是jsdelivr的使用技巧,不多做讨论。


靓仔已经在迫不及待的加我友链了,而靓女还在犹豫要不要再加下我的联系方式。
提交issues自动更新友链
使用issues自动更新友链的实质是借助相应的API读取仓库issues并获取相应的数据,然后用js写到页面上。因为不同的js没法根据配置文件进行主题样式切换,所以请读者自行选择相应的方案。(事实上两种样式是可以共存的,因为通过读取issues写入友链页面的就是完整的HTML语言,只要同时加载flink.styl和site-card.styl的内容,赋予它样式就好。真正没法共存的是通过读取link.yml生成友链页面的部分。)
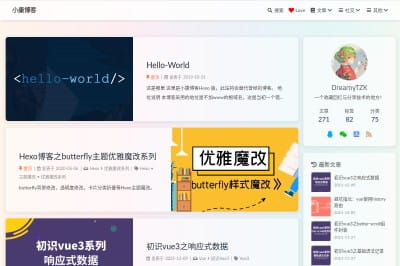
原生butterfly友链样式,根据issues进行更新的方案,已有详细教程。请移步小康的文档库。
其中教程内的friend.js可能无法查看。此处提供可查看的链接:friend.js。

博客配置
点开查看博客配置方案
请移步站内教程:基于Butterfly的外挂标签引入 完成前置步骤引入。
如果不需要那么多标签,可以在基于Butterfly的外挂标签引入 教程基础上自行精简,只保留以下3个文件即可(其实核心只需要两个issues.js)。
1
2
3
4
5
6
7
8
9
10scripts
|__tag
|__issues.js
#渲染issues的脚本,必须
|__site.js
# 渲染site标签的脚本,若不需要在文章中使用站点卡片样式,可以不要
source
|__js
|__ issues.js
#读取issues的api的脚本。可以不要,并换成CDN外链。在友链页
[Blogroot]\source\link\index.md内添加如下内容作为标签定位:gitee仓库示例
1
{% issues sites | api=https://gitee.com/api/v5/repos/[GiteeUsername]/[GiteeReponame]/issues?sort=updated&state=open&page=1&per_page=100&labels=active %}
github仓库示例
1
{% issues sites | api=https://api.github.com/repos/[GithubUsername]/[GithubReponame]/issues?sort=updated&state=open&page=1&per_page=100&labels=active %}
之后即可让读者根据示例来提交友链了。
1
2
3
4
5
6
7
8{
"title": "",
"screenshot": "",
"url": "",
"avatar": "",
"description": "",
"「keywords」": ""
}
| 参数 | 释义 |
|---|---|
| title | 网站名称 |
| screenshot | 网站预览图 |
| url | 网站链接,需要添加https://协议组成完整域名。否则可能被识别成站点相对路径。 |
| avatar | 站长头像 |
| 「keywords」 | 分组依据, 未必要叫「keywords」, 详见基于Butterfly的外挂标签引入 第21节对issues标签的参数解释 |
仓库配置
Github配置方案
新建一个仓库,仓库名随意,这里我命名为
friend_link,
新建文件friend_link\.github\ISSUE_TEMPLATE.md,
并在其中输入以下内容作为issues模板。其中的json代码块前面的反斜杠记得删去。此处这么写主要是为了转义,否则无法嵌套代码块。
1
2
3
4
5
6
7
8
9
10
11
12
13
14
15
16
17
18
19
20
21
22
23
24
25
26
27
28
29
30
31
32
33
34
35
36
37---
name: 友链模板
about: 请根据指示规范填写友链格式。
---
<!-- 请在下方代码块的双引号中填写 -->
\```json
{
"title": "",
"screenshot": "",
"url": "",
"avatar": "",
"description": "",
"keywords": ""
}
\```
<!--
"title": "站点名称",
"screenshot": "站点预览图链接",
"url": "站点链接",
"avatar": "头像链接",
"description": "站点描述",
"keywords": "关键词,作为分组名"
-->
<!-- 示例 -->
<!--
"title": "Akilarの糖果屋",
"screenshot": "https://cdn.jsdelivr.net/gh/Akilarlxh/ScreenShot@gh-pages/akilar.top.jpg",
"url": "https://akilar.top/",
"avatar": "/img/siteicon/favicon.png",
"description": "期待您的光临!",
"keywords": "糖果屋"
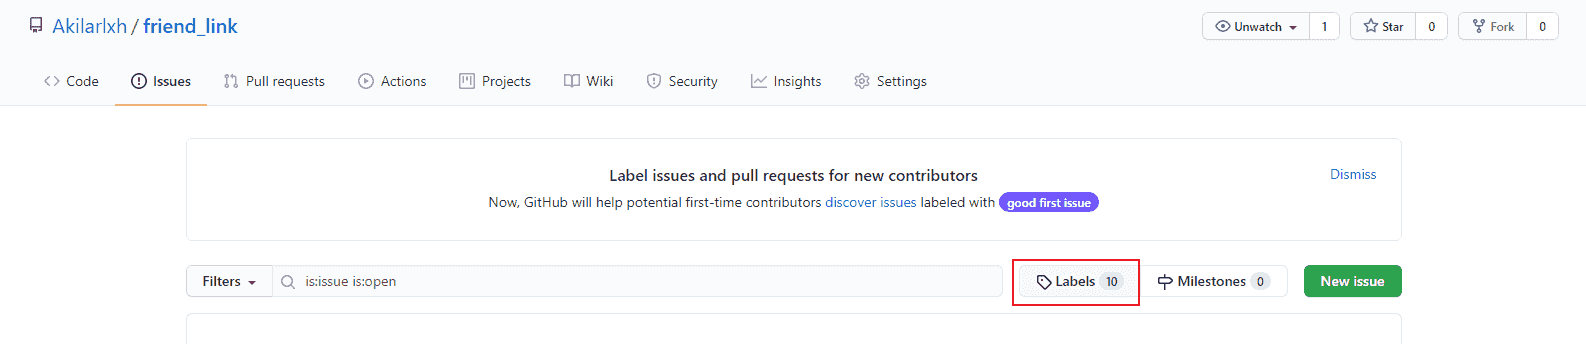
-->新建active label
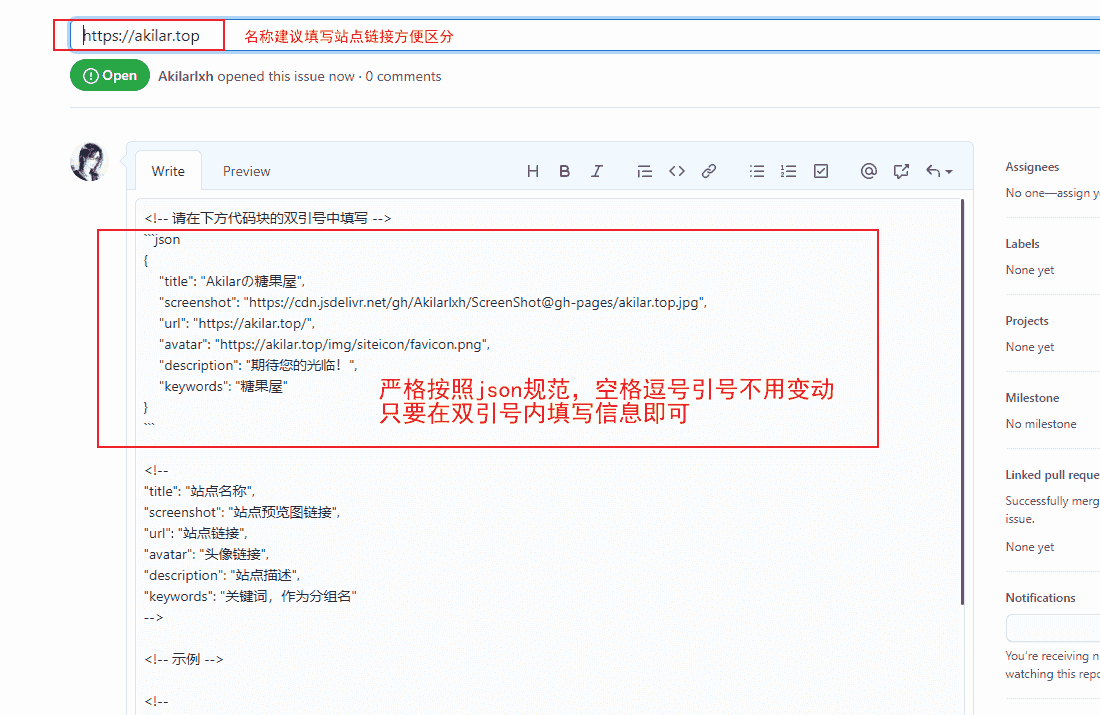
提交示例
从审核通过到页面读取有一段api的缓存期,稍微有点耐心。


Gitee配置方案
新建一个仓库,仓库名随意,这里我命名为
friend_link,
新建文件friend_link\.gitee\ISSUE_TEMPLATE.md,
并在其中输入以下内容作为issues模板。其中的json代码块前面的反斜杠记得删去。此处这么写主要是为了转义,否则无法嵌套代码块。
1
2
3
4
5
6
7
8
9
10
11
12
13
14
15
16
17
18
19
20
21
22
23
24
25
26
27
28
29
30
31
32
33
34
35
36
37---
name: 友链模板
about: 请根据指示规范填写友链格式。
---
<!-- 请在下方代码块的双引号中填写 -->
\```json
{
"title": "",
"screenshot": "",
"url": "",
"avatar": "",
"description": "",
"keywords": ""
}
\```
<!--
"title": "站点名称",
"screenshot": "站点预览图链接",
"url": "站点链接",
"avatar": "头像链接",
"description": "站点描述",
"keywords": "关键词,作为分组名"
-->
<!-- 示例 -->
<!--
"title": "Akilarの糖果屋",
"screenshot": "https://cdn.jsdelivr.net/gh/Akilarlxh/ScreenShot@gh-pages/akilar.top.jpg",
"url": "https://akilar.top/",
"avatar": "/img/siteicon/favicon.png",
"description": "期待您的光临!",
"keywords": "糖果屋"
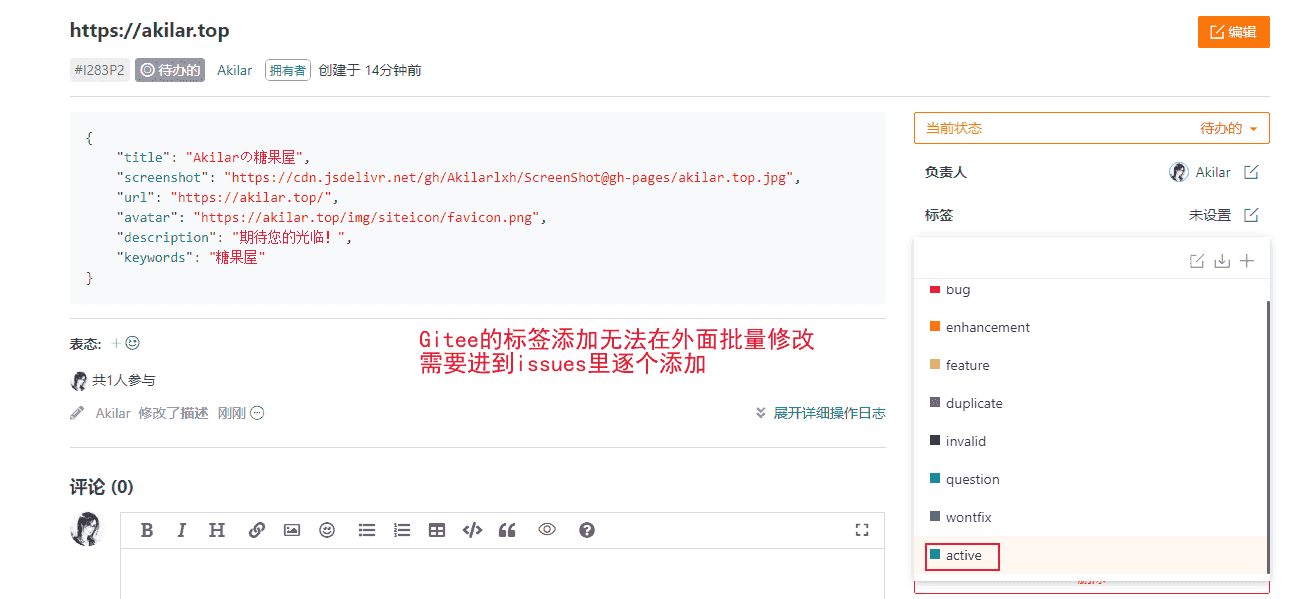
-->新建active标签
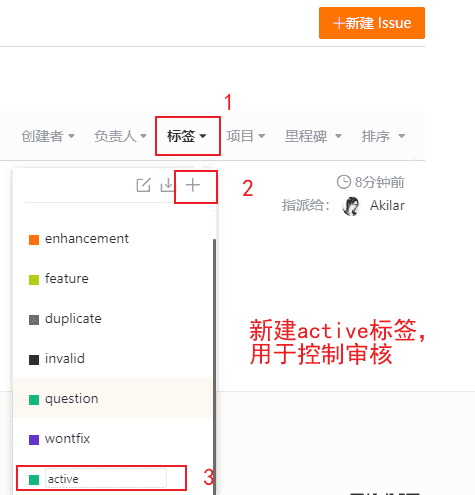
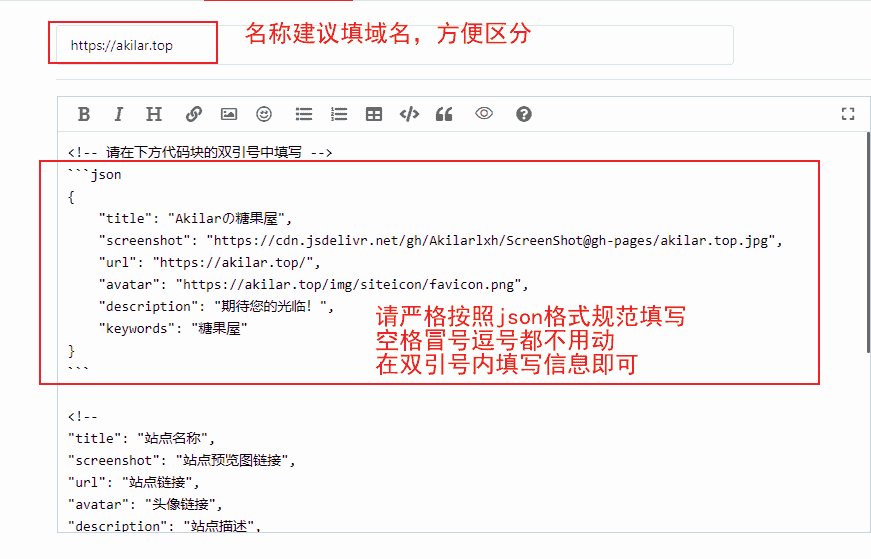
提交示例
从审核通过到页面读取有一段api的缓存期,稍微有点耐心。
更多内容
更多友链规范可以参考Volantis作者的友链页:
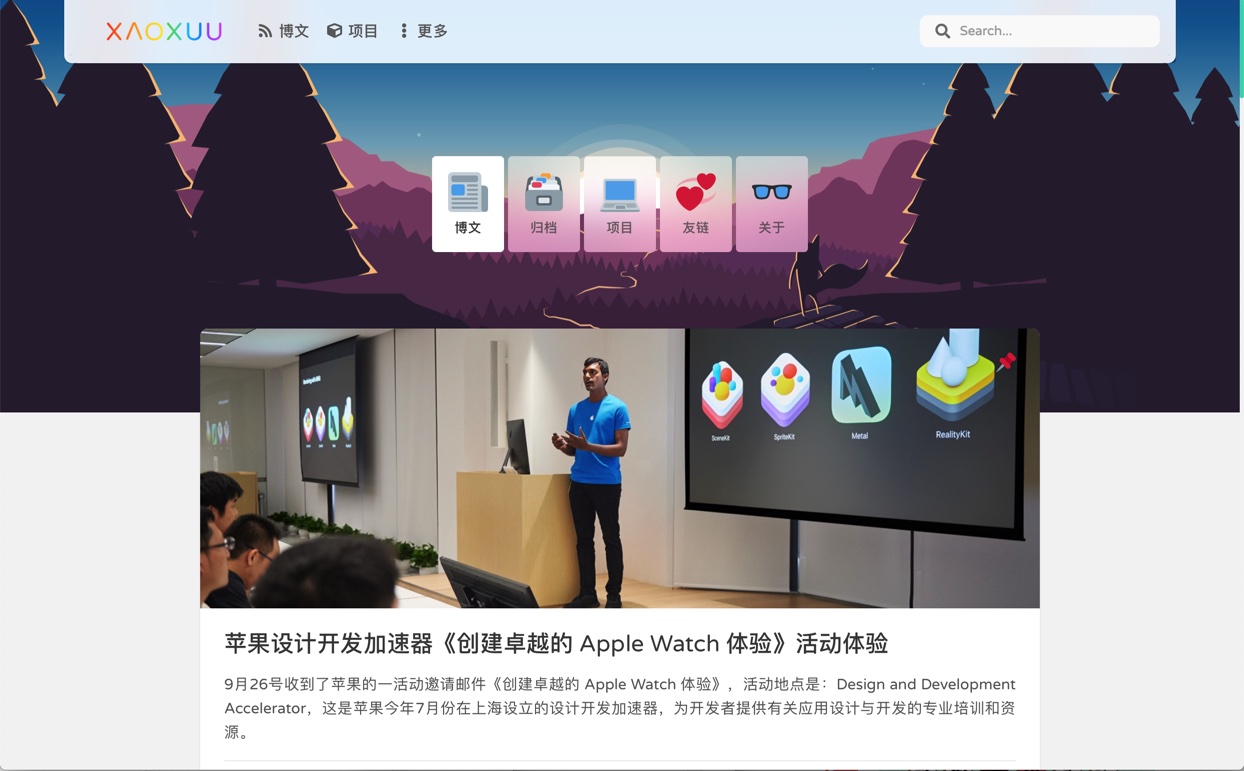
思路拓展:考虑到自动更新是读取issues,而有一款评论是直接将评论变为issues进行提交。也就是gitalk评论。想必头脑灵活的读者已经有思路了。主要是我自己懒得写了。
更多好帖
可能出现的BUG
根据Heo的反馈的BUG特性,如果开启了fancybox或者medium_zoom功能,会在页面编译时给img便签强行渲染上fancybox或者medium_zoom的外壳,导致小概率的点击图片放大时,会同时跳转到友链页。(反正我都是正常放大图片,没有跳转的情况。)
解决方案(相对的,友链图片将无法放大,酌情修改):
关闭fancybox,一劳永逸。- 给友链页的img标签添加禁止点击属性
style="pointer-events:none;"。使用内联样式,使得只对友链页生效而不会影响其他页面的fancybox渲染。修改[Blogroot]\themes\butterfly\layout\includes\page\flink.pug示例可能不是最新,注意内联样式的添加位置即可。
1
2
3
4
5
6
7
8
9
10
11if theme.lazyload.enable
- img(data-lazy-src=siteshot onerror=`this.onerror=null;this.src='` + url_for(theme.error_img.post_page) + `'` alt='' )
+ img(style="pointer-events:none;" data-lazy-src=siteshot onerror=`this.onerror=null;this.src='` + url_for(theme.error_img.post_page) + `'` alt='' )
else
img(src=siteshot onerror=`this.onerror=null;this.src='` + url_for(theme.error_img.post_page) + `'` alt='' )
.info
if theme.lazyload.enable
- img(data-lazy-src=url_for(item.avatar) onerror=`this.onerror=null;this.src='` + url_for(theme.error_img.flink) + `'` alt='' )
+ img(style="pointer-events:none;" data-lazy-src=url_for(item.avatar) onerror=`this.onerror=null;this.src='` + url_for(theme.error_img.flink) + `'` alt='' )
else
img(src=url_for(item.avatar) onerror=`this.onerror=null;this.src='` + url_for(theme.error_img.flink) + `'` alt='' )
issues写入友链需要jquery支持,Butterfly_v3.4.0以后实现去jquery化,需要自己添加jquery。还得保证加载顺序在issues.js之前。
1 | inject: |
部分读者反馈,在使用flexcard样式的友链时,头像被遮盖半个,无法完全显示。
- 主要原因是开启了
fancybox,强制给图片套了个壳,导致部分样式被覆写。 - 次要原因是对
flex的布局适用性较差。
解决方案,修改[Blogroot]\themes\butterfly\source\css\_page\flink.styl中关于flexcard的样式逻辑,使用!important控制权重。
1 | .info |
部分读者反馈,在使用flexcard样式的友链时,Butterfly的gallery相册样式出现严重偏移。推测是友链样式中某个标签定位重写的作用域没有限制好,导致堆叠样式重构。
紧急修复方案如下:
在自定义样式中加入以下内容:
1 | /*相册页面定位修复*/ |
如果不清楚怎么修改自定义css的读者可以参考站内教程:自定义魔改样式及示例
TO DO
flink.pug魔改,移值Volantis的site-card样式
保留原版友链,通过配置文件切换样式
siteshot站点预览图批量半自动化截图
使用issues,经审批后自动更新友链

Use this card to join the candyhome and participate in a pleasant discussion together .
Welcome to Akilar's candyhome,wish you a nice day .