
点击查看更新记录
更新记录
2023-01-12:修复归档页面页码样式错乱
- 修复归档页面页码样式错乱。
- 调整了定位错误。
2022-04-06:调整首页页码样式
- 调整首页页码样式。
2022-01-18:左上角标题新增最大宽度
- 对于768px以上的宽屏设备,设置描述窗最大宽度,防止横幅霸屏。
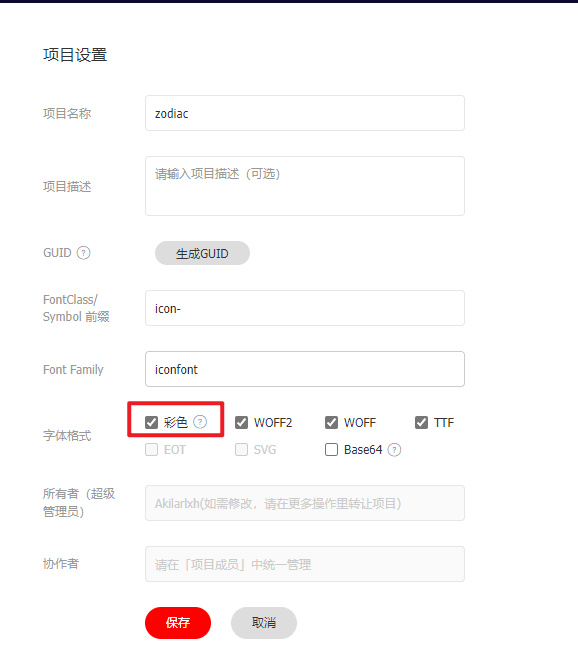
2022-01-14:方案更新警告
- iconfont的fontclass现已支持直接使用多彩色图标。
- symbol依然可用,但是考虑到魔改源码未必适合所有人,推荐还是用fontclass方式。
- 详情请见Hexo引入阿里矢量图标库-iconfont inject
- 总体上fontclass最适合萌新入门,而symbol则为长期最优解
2021-11-20:更新投币效果
- 新增媒体选择,因为手机端悬停时二维码会遮挡投币动画,手机端点击逻辑矛盾无解,故手机端不再启动动画。
- 新增投币音效,支持自行配置音频文件。
2021-04-18:新增四背景方案
- PC端日间夜间,手机端日间夜间,共有四个背景。
- 但是高度耦合,不利于后续升级主题。
- 且和自定义单页背景方案存在一定冲突。
- 个人不是很建议两者并用。
2021-04-18:重写自定义背景方案
- 增加夜间模式图片定义配置项。
- 切换夜间模式时换为夜间模式背景。
2021-04-18:修复每页自定义背景的背景的pjax bug
- 感谢@Toxic的反馈。
- 修复背景变化后不刷新的bug。
- 具体化示例描述。
2021-04-18:修复每页自定义背景的背景样式BUG
- 感谢@篁竹水声的反馈。
- 单页自定义背景在内联样式中重新定义图片,导致css外链样式中的几行定位属性失效。
- 重新在内联样式中添加一遍四行定位属性。
2021-04-13:新增social卡片彩色iconfont引入教程
- 重写social.pug,增加判断机制,实现和fontawesome的共存兼容。
- 提供适配fontawesome-animation的改写方案。
- social的写法格式调整至与menu_item一致。
2021-04-07:新增菜单栏彩色iconfont引入教程
- 改写menu_item.pug,增加判断机制,实现和fontawesome的共存兼容。
- 提供适配fontawesome-animation的改写方案。
2021-03-30:新增单页自定义背景教程
- 微调主题页面背景的显示逻辑,使得可以在markdown文件的front-matter中单独配置页面背景。
2021-02-07:追加修复手机顶栏样式bug
- 使用左上角标题魔改内容以后,有概率出现手机端切换页面时,手机端侧栏菜单变成PC端顶栏菜单。追加修复样式。
2021-02-05:新增主页文章封面节日挂件效果
- 修改首页文章封面,配合iconfont彩色图标,提供节日挂件效果。
2021-02-04:更新页脚振翅蝴蝶动效魔改
- 修改页脚版权声明内容,在中间放上振翅蝴蝶动画。
2021-01-29:更新页面左上角标题魔改
- 新增副标题判断机制
2021-01-21:更新打赏按钮投币动画魔改
- 打赏按钮新增投币动画
- 修复了主题现有的若打赏提示语过长,悬停色条填充长度不满的bug。
- 修复了复数打赏二维码时样式纵列的bug。
2021-01-21:更新页面左上角标题魔改
- 文章左上角站点标题改为文章标题,悬停显示文章描述。
- 改动范围增大,设置默认描述内容。
- 页面也可以设置。
写在最前
本帖因为是持续更新,所以如无必要,不会特别提供静态资源。对于缩进要求严格的语法格式文件,读者务必遵照缩进指示进行操作。diff代码块仅做色块标记,删除+、-号之后记得补全空格,调整缩进。
本帖编写于butterfly_v3.5.1,低版本可能不完全适用,请自行斟酌。
左上角站点标题
点击查看左上角标题魔改内容
改动页面的左上角显示内容。使得鼠标悬停左上角时显示描述。可以自己改描述的默认项。同时添加副标题属性。可以在Front-matter里使用subtitle定义副标题。如果副标题不存在,则显示主标题。
- 改动
[Blogroot]\themes\butterfly\layout\includes\header\nav.pug,当前的逻辑是文章内点击左上角标题是返回顶部。页面内点击左上角标题是返回首页。读者自己根据需要替换href=url_for('/')和onclick='btf.scrollToDest(0, 500)'即可。但是不可以都放哦,虽然不会报错,但是既要跳转到页面顶部又要返回首页的,逻辑不合理。1
2
3
4
5
6
7
8
9
10
11
12
13
14nav#nav
- span#blog_name
- a#site-name(href=url_for('/')) #[=config.title]
+ - var pagedescr = page.description ? page.description : '欢迎光临糖果屋,愿你有愉快的一天'
+ - var subtitle = page.subtitle ? page.subtitle : page.title
+ if is_post()
+ span#blog_name
+ a#site-name(onclick='btf.scrollToDest(0, 500)' data-title=pagedescr) #[=subtitle]
+ else if is_page()
+ span#blog_name
+ a#site-name(href=url_for('/') data-title=pagedescr) #[=subtitle]
+ else
+ span#blog_name
+ a#site-name(href=url_for('/') data-title=pagedescr) #[=config.title] - 因为
hexo自带缓存的关系,如果我们用的是缓存式引入的话,nav的刷新是惰性的,我们需要它根据文章和页面的切换实时变动。所以需要改动一下引入逻辑。修改[Blogroot]\themes\butterfly\layout\includes\header\index.pug,注意butterfly_v3.6.0取消了缓存配置,转为完全默认,需要将{cache:theme.fragment_cache}改为{cache: true}:1
2
3
4
5
6header#page-header(class=isHomeClass style=bg_img)
- !=partial('includes/header/nav', {}, {cache:theme.fragment_cache})
+ include ./nav.pug
if top_img !== false
if is_post()
include ./post-info.pug - 目前的改动会导致左上角标题过长时挤占
menu-item,为了不至于观感太差,需要设置自定义样式,设置标题超过长度自动隐藏。还要设置悬停时的提示框效果,自带title的提示框太丑了。新建[Blogroot]\themes\butterfly\source\css\_layout\custom.styl,1
2
3
4
5
6
7
8
9
10
11
12
13
14
15
16
17
18
19
20
21
22
23
24
25
26
27
28
29
30
31
32
33
34
35
36
37
38/*标题悬停显示文章描述*/
#site-name
&:hover
&:before
position: fixed
width:fit-content
margin:auto
left:0;
right:0
top:10%
border-radius: 10px
text-align: center
z-index: 100
content: attr(data-title)
font-size: 20px
color: #fff
padding: 10px
background-color: rgba($theme-color,0.9)
/* 夜间模式适配 */
[data-theme=dark]
a#site-name
&:hover
&:before
background-color: rgba(#121212,0.8)
/* 定义最大宽度放置横幅霸屏 */
@media screen and (min-width: 768px)
a#site-name
&:hover
&:before
max-width 800px
/*标题超过隐藏并显示省略号*/
@media screen and (max-width: 768px)
a#site-name
-webkit-line-clamp 1
word-break break-all
display -webkit-box
-webkit-box-orient vertical
overflow hidden - 新增副标题判断机制,可以在主标题下面设置副标题。如果副标题不存在,则右上角默认显示主标题。
1
2
3
4
5---
title: 糖果屋微调合集
subtitle: 持续更新ing...
description: 将本站针对butterfly主题的亿点点小改动做个集锦。
--- - 极有可能出现的bug: 使用左上角标题魔改内容以后,有概率出现手机端切换页面时,手机端侧栏菜单变成PC端顶栏菜单。追加修复样式。修改
[Blogroot]\themes\butterfly\source\css\_layout\head.styl1
2
3
4
5
6
7
8
9
10
11
12
13
14
15
16@media screen and (max-width: 768px)
#nav
#toggle-menu
display: inline-block !important
.site-page
font-size: inherit
.menus_items
position: absolute
left: 0
visibility: hidden
opacity: 0
#search-button span
display: none !important
打赏按钮投币彩蛋效果
改动文章页下方的打赏按钮,增加投币动画彩蛋。
- 修改
[Blogroot]\themes\butterfly\layout\includes\post\reward.pug1
2
3
4
5
6
7
8
9
10
11
12
13
14
15
16
17
18
19
20
21
22
23
24
25
26
27+ link(rel='stylesheet' href=url_for(theme.CDN.coin_css) media="defer" onload="this.media='all'")
.post-reward
- .reward-button
- i.fas.fa-qrcode
- = ' ' + _p('donate')
+ button.tip-button.reward-button
+ span.tip-button__text= _p('donate')
+ .coin-wrapper
+ .coin
+ .coin__middle
+ .coin__back
+ .coin__front
.reward-main
ul.reward-all
each item in theme.reward.QR_code
- var clickTo = (item.itemlist||item).link ? (item.itemlist||item).link : (item.itemlist||item).img
li.reward-item
a(href=clickTo target='_blank')
if theme.lazyload.enable
img.post-qr-code-img(data-lazy-src=url_for((item.itemlist||item).img) alt=(item.itemlist||item).text)
else
img.post-qr-code-img(src=url_for((item.itemlist||item).img) alt=(item.itemlist||item).text)
.post-qr-code-desc=(item.itemlist||item).text
+ if theme.reward.coinAudio
+ - var coinAudio = theme.reward.coinAudio ? url_for(theme.reward.coinAudio) : 'https://npm.elemecdn.com/akilar-candyassets@1.0.16/audio/coin.mp3'
+ audio#coinAudio(src=coinAudio)
+ script(defer src=url_for(theme.CDN.coin_js)) - 新建
[Blogroot]\themes\butterfly\source\css\coin.css1
2
3
4
5
6
7
8
9
10
11
12
13
14
15
16
17
18
19
20
21
22
23
24
25
26
27
28
29
30
31
32
33
34
35
36
37
38
39
40
41
42
43
44
45
46
47
48
49
50
51
52
53
54
55
56
57
58
59
60
61
62
63
64
65
66
67
68
69
70
71
72
73
74
75
76
77
78
79
80
81
82
83
84
85
86
87
88
89
90
91
92
93
94
95
96
97
98
99
100
101
102
103
104
105
106
107
108
109
110
111
112
113
114
115
116
117
118
119
120
121
122
123
124
125
126
127
128
129
130
131
132
133
134
135
136
137
138
139
140
141
142
143
144
145
146
147
148
149
150
151
152
153
154
155
156
157
158
159
160
161
162
163
164
165
166
167
168
169
170
171
172
173
174
175
176
177
178
179
180
181
182
183
184
185
186
187
188
189
190.tip-button {
border: 0;
border-radius: 0.25rem;
cursor: pointer;
font-size: 20px;
font-weight: 600;
height: 2.6rem;
margin-bottom: -4rem;
outline: 0;
position: relative;
top: 0;
transform-origin: 0% 100%;
transition: transform 50ms ease-in-out;
width: auto;
-webkit-tap-highlight-color: transparent;
}
.tip-button:active {
transform: rotate(4deg);
}
.tip-button.clicked {
animation: 150ms ease-in-out 1 shake;
pointer-events: none;
}
.tip-button.clicked .tip-button__text {
opacity: 0;
transition: opacity 100ms linear 200ms;
}
.tip-button.clicked::before {
height: 0.5rem;
width: 60%;
background: $button-hover-color;
}
.tip-button.clicked .coin {
transition: margin-bottom 1s linear 200ms;
margin-bottom: 0;
}
.tip-button.shrink-landing::before {
transition: width 200ms ease-in;
width: 0;
}
.tip-button.coin-landed::after {
opacity: 1;
transform: scale(1);
transform-origin: 50% 100%;
}
.tip-button.coin-landed .coin-wrapper {
background: radial-gradient(circle at 35% 97%, rgba(3, 16, 50, 0.4) 0.04rem, transparent 0.04rem), radial-gradient(circle at 45% 92%, rgba(3, 16, 50, 0.4) 0.04rem, transparent 0.02rem), radial-gradient(circle at 55% 98%, rgba(3, 16, 50, 0.4) 0.04rem, transparent 0.04rem), radial-gradient(circle at 65% 96%, rgba(3, 16, 50, 0.4) 0.06rem, transparent 0.06rem);
background-position: center bottom;
background-size: 100%;
bottom: -1rem;
opacity: 0;
transform: scale(2) translateY(-10px);
}
.tip-button__text {
color: #fff;
margin-right: 1.8rem;
opacity: 1;
position: relative;
transition: opacity 100ms linear 500ms;
z-index: 3;
}
.tip-button::before {
border-radius: 0.25rem;
bottom: 0;
content: '';
display: block;
height: 100%;
left: 50%;
position: absolute;
transform: translateX(-50%);
transition: height 250ms ease-in-out 400ms, width 250ms ease-in-out 300ms;
width: 100%;
z-index: 2;
}
.tip-button::after {
bottom: -1rem;
color: white;
content: 'ヾ(≧O≦)〃嗷~'; /*点击后显示的内容*/
height: 110%;
left: 0;
opacity: 0;
position: absolute;
pointer-events: none;
text-align: center;
transform: scale(0);
transform-origin: 50% 20%;
transition: transform 200ms cubic-bezier(0, 0, 0.35, 1.43);
width: 100%;
z-index: 1;
}
.coin-wrapper {
background: none;
bottom: 0;
height: 18rem;
left: 0;
opacity: 1;
overflow: hidden;
pointer-events: none;
position: absolute;
transform: none;
transform-origin: 50% 100%;
transition: opacity 200ms linear 100ms, transform 300ms ease-out;
width: 100%;
}
.coin {
--front-y-multiplier: 0;
--back-y-multiplier: 0;
--coin-y-multiplier: 0;
--coin-x-multiplier: 0;
--coin-scale-multiplier: 0;
--coin-rotation-multiplier: 0;
--shine-opacity-multiplier: 0.4;
--shine-bg-multiplier: 50%;
bottom: calc(var(--coin-y-multiplier) * 1rem - 3.5rem);
height: 3.5rem;
margin-bottom: 3.05rem;
position: absolute;
right: calc(var(--coin-x-multiplier) * 34% + 16%);
transform: translateX(50%) scale(calc(0.4 + var(--coin-scale-multiplier))) rotate(calc(var(--coin-rotation-multiplier) * -1deg));
transition: opacity 100ms linear 200ms;
width: 3.5rem;
z-index: 3;
}
.coin__front, .coin__middle, .coin__back, .coin::before, .coin__front::after, .coin__back::after {
border-radius: 50%;
box-sizing: border-box;
height: 100%;
left: 0;
position: absolute;
width: 100%;
z-index: 3;
}
.coin__front {
background: radial-gradient(circle at 50% 50%, transparent 50%, rgba(115, 124, 153, 0.4) 54%, #c2cadf 54%), linear-gradient(210deg, #8590b3 32%, transparent 32%), linear-gradient(150deg, #8590b3 32%, transparent 32%), linear-gradient(to right, #8590b3 22%, transparent 22%, transparent 78%, #8590b3 78%), linear-gradient(to bottom, #fcfaf9 44%, transparent 44%, transparent 65%, #fcfaf9 65%, #fcfaf9 71%, #8590b3 71%), linear-gradient(to right, transparent 28%, #fcfaf9 28%, #fcfaf9 34%, #8590b3 34%, #8590b3 40%, #fcfaf9 40%, #fcfaf9 47%, #8590b3 47%, #8590b3 53%, #fcfaf9 53%, #fcfaf9 60%, #8590b3 60%, #8590b3 66%, #fcfaf9 66%, #fcfaf9 72%, transparent 72%);
background-color: #8590b3;
background-size: 100% 100%;
transform: translateY(calc(var(--front-y-multiplier) * 0.3181818182rem / 2)) scaleY(var(--front-scale-multiplier));
}
.coin__front::after {
background: rgba(0, 0, 0, 0.2);
content: '';
opacity: var(--front-y-multiplier);
}
.coin__middle {
background: #737c99;
transform: translateY(calc(var(--middle-y-multiplier) * 0.3181818182rem / 2)) scaleY(var(--middle-scale-multiplier));
}
.coin__back {
background: radial-gradient(circle at 50% 50%, transparent 50%, rgba(115, 124, 153, 0.4) 54%, #c2cadf 54%), radial-gradient(circle at 50% 40%, #fcfaf9 23%, transparent 23%), radial-gradient(circle at 50% 100%, #fcfaf9 35%, transparent 35%);
background-color: #8590b3;
background-size: 100% 100%;
transform: translateY(calc(var(--back-y-multiplier) * 0.3181818182rem / 2)) scaleY(var(--back-scale-multiplier));
}
.coin__back::after {
background: rgba(0, 0, 0, 0.2);
content: '';
opacity: var(--back-y-multiplier);
}
.coin::before {
background: radial-gradient(circle at 25% 65%, transparent 50%, rgba(255, 255, 255, 0.9) 90%), linear-gradient(55deg, transparent calc(var(--shine-bg-multiplier) + 0%), #e9f4ff calc(var(--shine-bg-multiplier) + 0%), transparent calc(var(--shine-bg-multiplier) + 50%));
content: '';
opacity: var(--shine-opacity-multiplier);
transform: translateY(calc(var(--middle-y-multiplier) * 0.3181818182rem / -2)) scaleY(var(--middle-scale-multiplier)) rotate(calc(var(--coin-rotation-multiplier) * 1deg));
z-index: 10;
}
.coin::after {
background: #737c99;
content: '';
height: 0.3181818182rem;
left: 0;
position: absolute;
top: 50%;
transform: translateY(-50%);
width: 100%;
z-index: 2;
}
@keyframes shake {
0% {
transform: rotate(4deg);
}
66% {
transform: rotate(-4deg);
}
100% {
transform: rotate();
}
} - 新建
[Blogroot]\themes\butterfly\source\js\coin.js1
2
3
4
5
6
7
8
9
10
11
12
13
14
15
16
17
18
19
20
21
22
23
24
25
26
27
28
29
30
31
32
33
34
35
36
37
38
39
40
41
42
43
44
45
46
47
48
49
50
51
52
53
54
55
56
57
58
59
60
61
62
63
64
65
66
67
68
69
70
71
72
73
74
75
76
77
78
79
80
81
82
83
84
85
86
87
88
89
90var tipButtons = document.querySelectorAll('.tip-button')
function coinAudio() {
var coinAudio = document.getElementById("coinAudio");
if (coinAudio) {
coinAudio.play();//有音频时播放
}
}
// Loop through all buttons (allows for multiple buttons on page)
tipButtons.forEach((button) => {
var coin = button.querySelector('.coin')
// The larger the number, the slower the animation
coin.maxMoveLoopCount = 90
button.addEventListener('click', () => {
if (/Android|webOS|BlackBerry/i.test(navigator.userAgent)) return true; //媒体选择
if (button.clicked) return
button.classList.add('clicked')
// Wait to start flipping th coin because of the button tilt animation
setTimeout(() => {
// Randomize the flipping speeds just for fun
coin.sideRotationCount = Math.floor(Math.random() * 5) * 90
coin.maxFlipAngle = (Math.floor(Math.random() * 4) + 3) * Math.PI
button.clicked = true
flipCoin()
coinAudio()
}, 50)
})
var flipCoin = () => {
coin.moveLoopCount = 0
flipCoinLoop()
}
var resetCoin = () => {
coin.style.setProperty('--coin-x-multiplier', 0)
coin.style.setProperty('--coin-scale-multiplier', 0)
coin.style.setProperty('--coin-rotation-multiplier', 0)
coin.style.setProperty('--shine-opacity-multiplier', 0.4)
coin.style.setProperty('--shine-bg-multiplier', '50%')
coin.style.setProperty('opacity', 1)
// Delay to give the reset animation some time before you can click again
setTimeout(() => {
button.clicked = false
}, 300)
}
var flipCoinLoop = () => {
coin.moveLoopCount++
var percentageCompleted = coin.moveLoopCount / coin.maxMoveLoopCount
coin.angle = -coin.maxFlipAngle * Math.pow((percentageCompleted - 1), 2) + coin.maxFlipAngle
// Calculate the scale and position of the coin moving through the air
coin.style.setProperty('--coin-y-multiplier', -11 * Math.pow(percentageCompleted * 2 - 1, 4) + 11)
coin.style.setProperty('--coin-x-multiplier', percentageCompleted)
coin.style.setProperty('--coin-scale-multiplier', percentageCompleted * 0.6)
coin.style.setProperty('--coin-rotation-multiplier', percentageCompleted * coin.sideRotationCount)
// Calculate the scale and position values for the different coin faces
// The math uses sin/cos wave functions to similate the circular motion of 3D spin
coin.style.setProperty('--front-scale-multiplier', Math.max(Math.cos(coin.angle), 0))
coin.style.setProperty('--front-y-multiplier', Math.sin(coin.angle))
coin.style.setProperty('--middle-scale-multiplier', Math.abs(Math.cos(coin.angle), 0))
coin.style.setProperty('--middle-y-multiplier', Math.cos((coin.angle + Math.PI / 2) % Math.PI))
coin.style.setProperty('--back-scale-multiplier', Math.max(Math.cos(coin.angle - Math.PI), 0))
coin.style.setProperty('--back-y-multiplier', Math.sin(coin.angle - Math.PI))
coin.style.setProperty('--shine-opacity-multiplier', 4 * Math.sin((coin.angle + Math.PI / 2) % Math.PI) - 3.2)
coin.style.setProperty('--shine-bg-multiplier', -40 * (Math.cos((coin.angle + Math.PI / 2) % Math.PI) - 0.5) + '%')
// Repeat animation loop
if (coin.moveLoopCount < coin.maxMoveLoopCount) {
if (coin.moveLoopCount === coin.maxMoveLoopCount - 6) button.classList.add('shrink-landing')
window.requestAnimationFrame(flipCoinLoop)
} else {
button.classList.add('coin-landed')
coin.style.setProperty('opacity', 0)
setTimeout(() => {
button.classList.remove('clicked', 'shrink-landing', 'coin-landed')
setTimeout(() => {
resetCoin()
}, 300)
}, 1500)
}
}
}) - 修改
_config.butterfly.yml,添加音频文件配置项,添加CDN配置项:1
2
3
4
5
6
7
8
9
10
11
12
13
14
15
16
17# Sponsor/reward
reward:
enable: true
+ coinAudio: https://npm.elemecdn.com/akilar-candyassets@1.0.16/audio/coin.mp3
QR_code:
。
。
。
CDN:
# main
main_css: /css/index.css
jquery: https://npm.elemecdn.com/jquery@latest/dist/jquery.min.js
main: /js/main.js
utils:/js/utils.js
+ # 打赏按钮投币效果
+ coin_js: /js/coin.js
+ coin_css: /css/coin.css - 现在的打赏按钮样式需要稍作适配,当前若提示语太长,悬停时会无法显示完全。需要微调一下,修改
[Blogroot]\themes\butterfly\source\css\_layout\reward.styl:- 修改悬停打赏按钮时的颜色填充长度:
1
2
3
4
5
6
7
8
9
10
11.reward-button
display: inline-block
padding: .2rem 1.2rem
background: var(--btn-bg)
color: var(--btn-color)
cursor: pointer
transition: all .4s
&:hover
- box-shadow: inset 9em 0 0 0 var(--btn-hover-color)
+ box-shadow: inset 20em 0 0 0 var(--btn-hover-color) - 修改打赏二维码的样式(仅针对2张二维码的情况,单张不用改动。两张以上需要自己调试这两个参数)
1
2
3
4
5
6
7
8
9
10.reward-main
position: absolute
bottom: 40px
- left: 0
+ left: -25%
z-index: 100
display: none
padding: 0 0 15px
- width: 100%
+ width: 150%
- 修改悬停打赏按钮时的颜色填充长度:
改动文章页下方的打赏按钮,增加投币动画彩蛋。v3.6.0重写了reward.pug,适配起来有动画偏移兼容问题。考虑到这部分是嵌入式样式,所以大可以直接把reward相关内容局部回退至3.5.1。
- 修改
[Blogroot]\themes\butterfly\layout\includes\post\reward.pug,整体替换为以下内容:1
2
3
4
5
6
7
8
9
10
11
12
13
14
15
16
17
18
19
20
21
22
23
24link(rel='stylesheet' href=url_for(theme.CDN.coin_css) media="defer" onload="this.media='all'")
.post-reward
button.tip-button.reward-button
span.tip-button__text= _p('donate')
.coin-wrapper
.coin
.coin__middle
.coin__back
.coin__front
.reward-main
ul.reward-all
each item in theme.reward.QR_code
- var clickTo = (item.itemlist||item).link ? (item.itemlist||item).link : (item.itemlist||item).img
li.reward-item
a(href=clickTo target='_blank')
if theme.lazyload.enable
img.post-qr-code-img(data-lazy-src=url_for((item.itemlist||item).img) alt=(item.itemlist||item).text)
else
img.post-qr-code-img(src=url_for((item.itemlist||item).img) alt=(item.itemlist||item).text)
.post-qr-code-desc=(item.itemlist||item).text
if theme.reward.coinAudio
- var coinAudio = theme.reward.coinAudio ? url_for(theme.reward.coinAudio) : 'https://npm.elemecdn.com/akilar-candyassets@1.0.16/audio/coin.mp3'
audio#coinAudio(src=coinAudio)
script(defer src=url_for(theme.CDN.coin_js)) - 新建
[Blogroot]\themes\butterfly\source\css\coin.css1
2
3
4
5
6
7
8
9
10
11
12
13
14
15
16
17
18
19
20
21
22
23
24
25
26
27
28
29
30
31
32
33
34
35
36
37
38
39
40
41
42
43
44
45
46
47
48
49
50
51
52
53
54
55
56
57
58
59
60
61
62
63
64
65
66
67
68
69
70
71
72
73
74
75
76
77
78
79
80
81
82
83
84
85
86
87
88
89
90
91
92
93
94
95
96
97
98
99
100
101
102
103
104
105
106
107
108
109
110
111
112
113
114
115
116
117
118
119
120
121
122
123
124
125
126
127
128
129
130
131
132
133
134
135
136
137
138
139
140
141
142
143
144
145
146
147
148
149
150
151
152
153
154
155
156
157
158
159
160
161
162
163
164
165
166
167
168
169
170
171
172
173
174
175
176
177
178
179
180
181
182
183
184
185
186
187
188
189
190.tip-button {
border: 0;
border-radius: 0.25rem;
cursor: pointer;
font-size: 20px;
font-weight: 600;
height: 2.6rem;
margin-bottom: -4rem;
outline: 0;
position: relative;
top: 0;
transform-origin: 0% 100%;
transition: transform 50ms ease-in-out;
width: auto;
-webkit-tap-highlight-color: transparent;
}
.tip-button:active {
transform: rotate(4deg);
}
.tip-button.clicked {
animation: 150ms ease-in-out 1 shake;
pointer-events: none;
}
.tip-button.clicked .tip-button__text {
opacity: 0;
transition: opacity 100ms linear 200ms;
}
.tip-button.clicked::before {
height: 0.5rem;
width: 60%;
background: $button-hover-color;
}
.tip-button.clicked .coin {
transition: margin-bottom 1s linear 200ms;
margin-bottom: 0;
}
.tip-button.shrink-landing::before {
transition: width 200ms ease-in;
width: 0;
}
.tip-button.coin-landed::after {
opacity: 1;
transform: scale(1);
transform-origin: 50% 100%;
}
.tip-button.coin-landed .coin-wrapper {
background: radial-gradient(circle at 35% 97%, rgba(3, 16, 50, 0.4) 0.04rem, transparent 0.04rem), radial-gradient(circle at 45% 92%, rgba(3, 16, 50, 0.4) 0.04rem, transparent 0.02rem), radial-gradient(circle at 55% 98%, rgba(3, 16, 50, 0.4) 0.04rem, transparent 0.04rem), radial-gradient(circle at 65% 96%, rgba(3, 16, 50, 0.4) 0.06rem, transparent 0.06rem);
background-position: center bottom;
background-size: 100%;
bottom: -1rem;
opacity: 0;
transform: scale(2) translateY(-10px);
}
.tip-button__text {
color: #fff;
margin-right: 1.8rem;
opacity: 1;
position: relative;
transition: opacity 100ms linear 500ms;
z-index: 3;
}
.tip-button::before {
border-radius: 0.25rem;
bottom: 0;
content: '';
display: block;
height: 100%;
left: 50%;
position: absolute;
transform: translateX(-50%);
transition: height 250ms ease-in-out 400ms, width 250ms ease-in-out 300ms;
width: 100%;
z-index: 2;
}
.tip-button::after {
bottom: -1rem;
color: white;
content: 'ヾ(≧O≦)〃嗷~'; /*点击后显示的内容*/
height: 110%;
left: 0;
opacity: 0;
position: absolute;
pointer-events: none;
text-align: center;
transform: scale(0);
transform-origin: 50% 20%;
transition: transform 200ms cubic-bezier(0, 0, 0.35, 1.43);
width: 100%;
z-index: 1;
}
.coin-wrapper {
background: none;
bottom: 0;
height: 18rem;
left: 0;
opacity: 1;
overflow: hidden;
pointer-events: none;
position: absolute;
transform: none;
transform-origin: 50% 100%;
transition: opacity 200ms linear 100ms, transform 300ms ease-out;
width: 100%;
}
.coin {
--front-y-multiplier: 0;
--back-y-multiplier: 0;
--coin-y-multiplier: 0;
--coin-x-multiplier: 0;
--coin-scale-multiplier: 0;
--coin-rotation-multiplier: 0;
--shine-opacity-multiplier: 0.4;
--shine-bg-multiplier: 50%;
bottom: calc(var(--coin-y-multiplier) * 1rem - 3.5rem);
height: 3.5rem;
margin-bottom: 3.05rem;
position: absolute;
right: calc(var(--coin-x-multiplier) * 34% + 16%);
transform: translateX(50%) scale(calc(0.4 + var(--coin-scale-multiplier))) rotate(calc(var(--coin-rotation-multiplier) * -1deg));
transition: opacity 100ms linear 200ms;
width: 3.5rem;
z-index: 3;
}
.coin__front, .coin__middle, .coin__back, .coin::before, .coin__front::after, .coin__back::after {
border-radius: 50%;
box-sizing: border-box;
height: 100%;
left: 0;
position: absolute;
width: 100%;
z-index: 3;
}
.coin__front {
background: radial-gradient(circle at 50% 50%, transparent 50%, rgba(115, 124, 153, 0.4) 54%, #c2cadf 54%), linear-gradient(210deg, #8590b3 32%, transparent 32%), linear-gradient(150deg, #8590b3 32%, transparent 32%), linear-gradient(to right, #8590b3 22%, transparent 22%, transparent 78%, #8590b3 78%), linear-gradient(to bottom, #fcfaf9 44%, transparent 44%, transparent 65%, #fcfaf9 65%, #fcfaf9 71%, #8590b3 71%), linear-gradient(to right, transparent 28%, #fcfaf9 28%, #fcfaf9 34%, #8590b3 34%, #8590b3 40%, #fcfaf9 40%, #fcfaf9 47%, #8590b3 47%, #8590b3 53%, #fcfaf9 53%, #fcfaf9 60%, #8590b3 60%, #8590b3 66%, #fcfaf9 66%, #fcfaf9 72%, transparent 72%);
background-color: #8590b3;
background-size: 100% 100%;
transform: translateY(calc(var(--front-y-multiplier) * 0.3181818182rem / 2)) scaleY(var(--front-scale-multiplier));
}
.coin__front::after {
background: rgba(0, 0, 0, 0.2);
content: '';
opacity: var(--front-y-multiplier);
}
.coin__middle {
background: #737c99;
transform: translateY(calc(var(--middle-y-multiplier) * 0.3181818182rem / 2)) scaleY(var(--middle-scale-multiplier));
}
.coin__back {
background: radial-gradient(circle at 50% 50%, transparent 50%, rgba(115, 124, 153, 0.4) 54%, #c2cadf 54%), radial-gradient(circle at 50% 40%, #fcfaf9 23%, transparent 23%), radial-gradient(circle at 50% 100%, #fcfaf9 35%, transparent 35%);
background-color: #8590b3;
background-size: 100% 100%;
transform: translateY(calc(var(--back-y-multiplier) * 0.3181818182rem / 2)) scaleY(var(--back-scale-multiplier));
}
.coin__back::after {
background: rgba(0, 0, 0, 0.2);
content: '';
opacity: var(--back-y-multiplier);
}
.coin::before {
background: radial-gradient(circle at 25% 65%, transparent 50%, rgba(255, 255, 255, 0.9) 90%), linear-gradient(55deg, transparent calc(var(--shine-bg-multiplier) + 0%), #e9f4ff calc(var(--shine-bg-multiplier) + 0%), transparent calc(var(--shine-bg-multiplier) + 50%));
content: '';
opacity: var(--shine-opacity-multiplier);
transform: translateY(calc(var(--middle-y-multiplier) * 0.3181818182rem / -2)) scaleY(var(--middle-scale-multiplier)) rotate(calc(var(--coin-rotation-multiplier) * 1deg));
z-index: 10;
}
.coin::after {
background: #737c99;
content: '';
height: 0.3181818182rem;
left: 0;
position: absolute;
top: 50%;
transform: translateY(-50%);
width: 100%;
z-index: 2;
}
@keyframes shake {
0% {
transform: rotate(4deg);
}
66% {
transform: rotate(-4deg);
}
100% {
transform: rotate();
}
} - 新建
[Blogroot]\themes\butterfly\source\js\coin.js1
2
3
4
5
6
7
8
9
10
11
12
13
14
15
16
17
18
19
20
21
22
23
24
25
26
27
28
29
30
31
32
33
34
35
36
37
38
39
40
41
42
43
44
45
46
47
48
49
50
51
52
53
54
55
56
57
58
59
60
61
62
63
64
65
66
67
68
69
70
71
72
73
74
75
76
77
78
79
80
81
82
83
84
85
86
87
88
89
90var tipButtons = document.querySelectorAll('.tip-button')
function coinAudio() {
var coinAudio = document.getElementById("coinAudio");
if (coinAudio) {
coinAudio.play();//有音频时播放
}
}
// Loop through all buttons (allows for multiple buttons on page)
tipButtons.forEach((button) => {
var coin = button.querySelector('.coin')
// The larger the number, the slower the animation
coin.maxMoveLoopCount = 90
button.addEventListener('click', () => {
if (/Android|webOS|BlackBerry/i.test(navigator.userAgent)) return true; //媒体选择
if (button.clicked) return
button.classList.add('clicked')
// Wait to start flipping th coin because of the button tilt animation
setTimeout(() => {
// Randomize the flipping speeds just for fun
coin.sideRotationCount = Math.floor(Math.random() * 5) * 90
coin.maxFlipAngle = (Math.floor(Math.random() * 4) + 3) * Math.PI
button.clicked = true
flipCoin()
coinAudio()
}, 50)
})
var flipCoin = () => {
coin.moveLoopCount = 0
flipCoinLoop()
}
var resetCoin = () => {
coin.style.setProperty('--coin-x-multiplier', 0)
coin.style.setProperty('--coin-scale-multiplier', 0)
coin.style.setProperty('--coin-rotation-multiplier', 0)
coin.style.setProperty('--shine-opacity-multiplier', 0.4)
coin.style.setProperty('--shine-bg-multiplier', '50%')
coin.style.setProperty('opacity', 1)
// Delay to give the reset animation some time before you can click again
setTimeout(() => {
button.clicked = false
}, 300)
}
var flipCoinLoop = () => {
coin.moveLoopCount++
var percentageCompleted = coin.moveLoopCount / coin.maxMoveLoopCount
coin.angle = -coin.maxFlipAngle * Math.pow((percentageCompleted - 1), 2) + coin.maxFlipAngle
// Calculate the scale and position of the coin moving through the air
coin.style.setProperty('--coin-y-multiplier', -11 * Math.pow(percentageCompleted * 2 - 1, 4) + 11)
coin.style.setProperty('--coin-x-multiplier', percentageCompleted)
coin.style.setProperty('--coin-scale-multiplier', percentageCompleted * 0.6)
coin.style.setProperty('--coin-rotation-multiplier', percentageCompleted * coin.sideRotationCount)
// Calculate the scale and position values for the different coin faces
// The math uses sin/cos wave functions to similate the circular motion of 3D spin
coin.style.setProperty('--front-scale-multiplier', Math.max(Math.cos(coin.angle), 0))
coin.style.setProperty('--front-y-multiplier', Math.sin(coin.angle))
coin.style.setProperty('--middle-scale-multiplier', Math.abs(Math.cos(coin.angle), 0))
coin.style.setProperty('--middle-y-multiplier', Math.cos((coin.angle + Math.PI / 2) % Math.PI))
coin.style.setProperty('--back-scale-multiplier', Math.max(Math.cos(coin.angle - Math.PI), 0))
coin.style.setProperty('--back-y-multiplier', Math.sin(coin.angle - Math.PI))
coin.style.setProperty('--shine-opacity-multiplier', 4 * Math.sin((coin.angle + Math.PI / 2) % Math.PI) - 3.2)
coin.style.setProperty('--shine-bg-multiplier', -40 * (Math.cos((coin.angle + Math.PI / 2) % Math.PI) - 0.5) + '%')
// Repeat animation loop
if (coin.moveLoopCount < coin.maxMoveLoopCount) {
if (coin.moveLoopCount === coin.maxMoveLoopCount - 6) button.classList.add('shrink-landing')
window.requestAnimationFrame(flipCoinLoop)
} else {
button.classList.add('coin-landed')
coin.style.setProperty('opacity', 0)
setTimeout(() => {
button.classList.remove('clicked', 'shrink-landing', 'coin-landed')
setTimeout(() => {
resetCoin()
}, 300)
}, 1500)
}
}
}) - 修改
_config.butterfly.yml,添加音频文件配置项,添加CDN配置项:1
2
3
4
5
6
7
8
9
10
11
12
13
14
15
16
17# Sponsor/reward
reward:
enable: true
+ coinAudio: https://npm.elemecdn.com/akilar-candyassets@1.0.16/audio/coin.mp3
QR_code:
。
。
。
CDN:
# main
main_css: /css/index.css
jquery: https://npm.elemecdn.com/jquery@latest/dist/jquery.min.js
main: /js/main.js
utils:/js/utils.js
+ # 打赏按钮投币效果
+ coin_js: /js/coin.js
+ coin_css: /css/coin.css - 现在的打赏按钮样式需要稍作适配,当前若提示语太长,悬停时会无法显示完全。需要微调一下,修改
[Blogroot]\themes\butterfly\source\css\_layout\reward.styl,整体替换为以下内容:还可以针对自己的情况适度调整以下内容:1
2
3
4
5
6
7
8
9
10
11
12
13
14
15
16
17
18
19
20
21
22
23
24
25
26
27
28
29
30
31
32
33
34
35
36
37
38
39
40
41
42
43
44
45
46
47
48
49
50
51
52
53
54
55
56
57
58
59
60
61
62
63
64
65
66
67
68
69
70
71.post-reward
position: relative
margin-top: 4rem
width: 100%
text-align: center
.reward-button
display: inline-block
padding: .2rem 1.2rem
background: var(--btn-bg)
color: var(--btn-color)
cursor: pointer
transition: all .4s
&:hover
box-shadow: inset 15em 0 0 0 var(--btn-hover-color)
.reward-main
display: block
.reward-main
position: absolute
bottom: 40px
left: -25%
z-index: 100
display: none
padding: 0 0 15px
width: 150%
.reward-all
display: inline-block
margin: 0
padding: 1rem .5rem
border-radius: 4px
background: var(--reward-pop)
&:before
position: absolute
bottom: -10px
left: 0
width: 100%
height: 20px
content: ''
&:after
position: absolute
right: 0
bottom: 2px
left: 0
margin: 0 auto
width: 0
height: 0
border-top: 13px solid var(--reward-pop)
border-right: 13px solid transparent
border-left: 13px solid transparent
content: ''
.reward-item
display: inline-block
padding: 0 6px
list-style-type: none
vertical-align: top
img
width: 130px
height: 130px
.post-qr-code-desc
padding-top: .4rem
width: 130px
color: $reward-pop-up-color- 修改悬停打赏按钮时的颜色填充长度:
1
2
3
4
5
6
7
8
9
10
11
.reward-button
display: inline-block
padding: .2rem 1.2rem
background: var(--btn-bg)
color: var(--btn-color)
cursor: pointer
transition: all .4s
&:hover
- box-shadow: inset 9em 0 0 0 var(--btn-hover-color)
+ box-shadow: inset 20em 0 0 0 var(--btn-hover-color) - 修改打赏二维码的样式(仅针对2张二维码的情况,单张不用改动。两张以上需要自己调试这两个参数)
1
2
3
4
5
6
7
8
9
10
.reward-main
position: absolute
bottom: 40px
- left: 0
+ left: -25%
z-index: 100
display: none
padding: 0 0 15px
- width: 100%
+ width: 150%
- 修改悬停打赏按钮时的颜色填充长度:
改动文章页下方的打赏按钮,增加投币动画彩蛋。v3.6.0重写了reward.pug,适配起来有动画偏移兼容问题。考虑到这部分是嵌入式样式,所以大可以直接把reward相关内容局部回退至3.5.1。
- 修改
[Blogroot]\themes\butterfly\layout\includes\post\reward.pug,整体替换为以下内容:1
2
3
4
5
6
7
8
9
10
11
12
13
14
15
16
17
18
19
20
21link(rel='stylesheet' href=url_for(theme.CDN.coin_css) media="defer" onload="this.media='all'")
.post-reward
button.tip-button.reward-button
span.tip-button__text= _p('donate')
.coin-wrapper
.coin
.coin__middle
.coin__back
.coin__front
.reward-main
ul.reward-all
each item in theme.reward.QR_code
- var clickTo = (item.itemlist||item).link ? (item.itemlist||item).link : (item.itemlist||item).img
li.reward-item
a(href=clickTo target='_blank')
img.post-qr-code-img(src=url_for((item.itemlist||item).img) alt=(item.itemlist||item).text)
.post-qr-code-desc=(item.itemlist||item).text
if theme.reward.coinAudio
- var coinAudio = theme.reward.coinAudio ? url_for(theme.reward.coinAudio) : 'https://npm.elemecdn.com/akilar-candyassets@1.0.16/audio/coin.mp3'
audio#coinAudio(src=coinAudio)
script(defer src=url_for(theme.CDN.coin_js)) - 新建
[Blogroot]\themes\butterfly\source\css\coin.css1
2
3
4
5
6
7
8
9
10
11
12
13
14
15
16
17
18
19
20
21
22
23
24
25
26
27
28
29
30
31
32
33
34
35
36
37
38
39
40
41
42
43
44
45
46
47
48
49
50
51
52
53
54
55
56
57
58
59
60
61
62
63
64
65
66
67
68
69
70
71
72
73
74
75
76
77
78
79
80
81
82
83
84
85
86
87
88
89
90
91
92
93
94
95
96
97
98
99
100
101
102
103
104
105
106
107
108
109
110
111
112
113
114
115
116
117
118
119
120
121
122
123
124
125
126
127
128
129
130
131
132
133
134
135
136
137
138
139
140
141
142
143
144
145
146
147
148
149
150
151
152
153
154
155
156
157
158
159
160
161
162
163
164
165
166
167
168
169
170
171
172
173
174
175
176
177
178
179
180
181
182
183
184
185
186
187
188
189
190.tip-button {
border: 0;
border-radius: 0.25rem;
cursor: pointer;
font-size: 20px;
font-weight: 600;
height: 2.6rem;
margin-bottom: -4rem;
outline: 0;
position: relative;
top: 0;
transform-origin: 0% 100%;
transition: transform 50ms ease-in-out;
width: auto;
-webkit-tap-highlight-color: transparent;
}
.tip-button:active {
transform: rotate(4deg);
}
.tip-button.clicked {
animation: 150ms ease-in-out 1 shake;
pointer-events: none;
}
.tip-button.clicked .tip-button__text {
opacity: 0;
transition: opacity 100ms linear 200ms;
}
.tip-button.clicked::before {
height: 0.5rem;
width: 60%;
background: $button-hover-color;
}
.tip-button.clicked .coin {
transition: margin-bottom 1s linear 200ms;
margin-bottom: 0;
}
.tip-button.shrink-landing::before {
transition: width 200ms ease-in;
width: 0;
}
.tip-button.coin-landed::after {
opacity: 1;
transform: scale(1);
transform-origin: 50% 100%;
}
.tip-button.coin-landed .coin-wrapper {
background: radial-gradient(circle at 35% 97%, rgba(3, 16, 50, 0.4) 0.04rem, transparent 0.04rem), radial-gradient(circle at 45% 92%, rgba(3, 16, 50, 0.4) 0.04rem, transparent 0.02rem), radial-gradient(circle at 55% 98%, rgba(3, 16, 50, 0.4) 0.04rem, transparent 0.04rem), radial-gradient(circle at 65% 96%, rgba(3, 16, 50, 0.4) 0.06rem, transparent 0.06rem);
background-position: center bottom;
background-size: 100%;
bottom: -1rem;
opacity: 0;
transform: scale(2) translateY(-10px);
}
.tip-button__text {
color: #fff;
margin-right: 1.8rem;
opacity: 1;
position: relative;
transition: opacity 100ms linear 500ms;
z-index: 3;
}
.tip-button::before {
border-radius: 0.25rem;
bottom: 0;
content: '';
display: block;
height: 100%;
left: 50%;
position: absolute;
transform: translateX(-50%);
transition: height 250ms ease-in-out 400ms, width 250ms ease-in-out 300ms;
width: 100%;
z-index: 2;
}
.tip-button::after {
bottom: -1rem;
color: white;
content: 'ヾ(≧O≦)〃嗷~'; /*点击后显示的内容*/
height: 110%;
left: 0;
opacity: 0;
position: absolute;
pointer-events: none;
text-align: center;
transform: scale(0);
transform-origin: 50% 20%;
transition: transform 200ms cubic-bezier(0, 0, 0.35, 1.43);
width: 100%;
z-index: 1;
}
.coin-wrapper {
background: none;
bottom: 0;
height: 18rem;
left: 0;
opacity: 1;
overflow: hidden;
pointer-events: none;
position: absolute;
transform: none;
transform-origin: 50% 100%;
transition: opacity 200ms linear 100ms, transform 300ms ease-out;
width: 100%;
}
.coin {
--front-y-multiplier: 0;
--back-y-multiplier: 0;
--coin-y-multiplier: 0;
--coin-x-multiplier: 0;
--coin-scale-multiplier: 0;
--coin-rotation-multiplier: 0;
--shine-opacity-multiplier: 0.4;
--shine-bg-multiplier: 50%;
bottom: calc(var(--coin-y-multiplier) * 1rem - 3.5rem);
height: 3.5rem;
margin-bottom: 3.05rem;
position: absolute;
right: calc(var(--coin-x-multiplier) * 34% + 16%);
transform: translateX(50%) scale(calc(0.4 + var(--coin-scale-multiplier))) rotate(calc(var(--coin-rotation-multiplier) * -1deg));
transition: opacity 100ms linear 200ms;
width: 3.5rem;
z-index: 3;
}
.coin__front, .coin__middle, .coin__back, .coin::before, .coin__front::after, .coin__back::after {
border-radius: 50%;
box-sizing: border-box;
height: 100%;
left: 0;
position: absolute;
width: 100%;
z-index: 3;
}
.coin__front {
background: radial-gradient(circle at 50% 50%, transparent 50%, rgba(115, 124, 153, 0.4) 54%, #c2cadf 54%), linear-gradient(210deg, #8590b3 32%, transparent 32%), linear-gradient(150deg, #8590b3 32%, transparent 32%), linear-gradient(to right, #8590b3 22%, transparent 22%, transparent 78%, #8590b3 78%), linear-gradient(to bottom, #fcfaf9 44%, transparent 44%, transparent 65%, #fcfaf9 65%, #fcfaf9 71%, #8590b3 71%), linear-gradient(to right, transparent 28%, #fcfaf9 28%, #fcfaf9 34%, #8590b3 34%, #8590b3 40%, #fcfaf9 40%, #fcfaf9 47%, #8590b3 47%, #8590b3 53%, #fcfaf9 53%, #fcfaf9 60%, #8590b3 60%, #8590b3 66%, #fcfaf9 66%, #fcfaf9 72%, transparent 72%);
background-color: #8590b3;
background-size: 100% 100%;
transform: translateY(calc(var(--front-y-multiplier) * 0.3181818182rem / 2)) scaleY(var(--front-scale-multiplier));
}
.coin__front::after {
background: rgba(0, 0, 0, 0.2);
content: '';
opacity: var(--front-y-multiplier);
}
.coin__middle {
background: #737c99;
transform: translateY(calc(var(--middle-y-multiplier) * 0.3181818182rem / 2)) scaleY(var(--middle-scale-multiplier));
}
.coin__back {
background: radial-gradient(circle at 50% 50%, transparent 50%, rgba(115, 124, 153, 0.4) 54%, #c2cadf 54%), radial-gradient(circle at 50% 40%, #fcfaf9 23%, transparent 23%), radial-gradient(circle at 50% 100%, #fcfaf9 35%, transparent 35%);
background-color: #8590b3;
background-size: 100% 100%;
transform: translateY(calc(var(--back-y-multiplier) * 0.3181818182rem / 2)) scaleY(var(--back-scale-multiplier));
}
.coin__back::after {
background: rgba(0, 0, 0, 0.2);
content: '';
opacity: var(--back-y-multiplier);
}
.coin::before {
background: radial-gradient(circle at 25% 65%, transparent 50%, rgba(255, 255, 255, 0.9) 90%), linear-gradient(55deg, transparent calc(var(--shine-bg-multiplier) + 0%), #e9f4ff calc(var(--shine-bg-multiplier) + 0%), transparent calc(var(--shine-bg-multiplier) + 50%));
content: '';
opacity: var(--shine-opacity-multiplier);
transform: translateY(calc(var(--middle-y-multiplier) * 0.3181818182rem / -2)) scaleY(var(--middle-scale-multiplier)) rotate(calc(var(--coin-rotation-multiplier) * 1deg));
z-index: 10;
}
.coin::after {
background: #737c99;
content: '';
height: 0.3181818182rem;
left: 0;
position: absolute;
top: 50%;
transform: translateY(-50%);
width: 100%;
z-index: 2;
}
@keyframes shake {
0% {
transform: rotate(4deg);
}
66% {
transform: rotate(-4deg);
}
100% {
transform: rotate();
}
} - 新建
[Blogroot]\themes\butterfly\source\js\coin.js1
2
3
4
5
6
7
8
9
10
11
12
13
14
15
16
17
18
19
20
21
22
23
24
25
26
27
28
29
30
31
32
33
34
35
36
37
38
39
40
41
42
43
44
45
46
47
48
49
50
51
52
53
54
55
56
57
58
59
60
61
62
63
64
65
66
67
68
69
70
71
72
73
74
75
76
77
78
79
80
81
82
83
84
85
86
87
88
89
90var tipButtons = document.querySelectorAll('.tip-button')
function coinAudio() {
var coinAudio = document.getElementById("coinAudio");
if (coinAudio) {
coinAudio.play();//有音频时播放
}
}
// Loop through all buttons (allows for multiple buttons on page)
tipButtons.forEach((button) => {
var coin = button.querySelector('.coin')
// The larger the number, the slower the animation
coin.maxMoveLoopCount = 90
button.addEventListener('click', () => {
if (/Android|webOS|BlackBerry/i.test(navigator.userAgent)) return true; //媒体选择
if (button.clicked) return
button.classList.add('clicked')
// Wait to start flipping th coin because of the button tilt animation
setTimeout(() => {
// Randomize the flipping speeds just for fun
coin.sideRotationCount = Math.floor(Math.random() * 5) * 90
coin.maxFlipAngle = (Math.floor(Math.random() * 4) + 3) * Math.PI
button.clicked = true
flipCoin()
coinAudio()
}, 50)
})
var flipCoin = () => {
coin.moveLoopCount = 0
flipCoinLoop()
}
var resetCoin = () => {
coin.style.setProperty('--coin-x-multiplier', 0)
coin.style.setProperty('--coin-scale-multiplier', 0)
coin.style.setProperty('--coin-rotation-multiplier', 0)
coin.style.setProperty('--shine-opacity-multiplier', 0.4)
coin.style.setProperty('--shine-bg-multiplier', '50%')
coin.style.setProperty('opacity', 1)
// Delay to give the reset animation some time before you can click again
setTimeout(() => {
button.clicked = false
}, 300)
}
var flipCoinLoop = () => {
coin.moveLoopCount++
var percentageCompleted = coin.moveLoopCount / coin.maxMoveLoopCount
coin.angle = -coin.maxFlipAngle * Math.pow((percentageCompleted - 1), 2) + coin.maxFlipAngle
// Calculate the scale and position of the coin moving through the air
coin.style.setProperty('--coin-y-multiplier', -11 * Math.pow(percentageCompleted * 2 - 1, 4) + 11)
coin.style.setProperty('--coin-x-multiplier', percentageCompleted)
coin.style.setProperty('--coin-scale-multiplier', percentageCompleted * 0.6)
coin.style.setProperty('--coin-rotation-multiplier', percentageCompleted * coin.sideRotationCount)
// Calculate the scale and position values for the different coin faces
// The math uses sin/cos wave functions to similate the circular motion of 3D spin
coin.style.setProperty('--front-scale-multiplier', Math.max(Math.cos(coin.angle), 0))
coin.style.setProperty('--front-y-multiplier', Math.sin(coin.angle))
coin.style.setProperty('--middle-scale-multiplier', Math.abs(Math.cos(coin.angle), 0))
coin.style.setProperty('--middle-y-multiplier', Math.cos((coin.angle + Math.PI / 2) % Math.PI))
coin.style.setProperty('--back-scale-multiplier', Math.max(Math.cos(coin.angle - Math.PI), 0))
coin.style.setProperty('--back-y-multiplier', Math.sin(coin.angle - Math.PI))
coin.style.setProperty('--shine-opacity-multiplier', 4 * Math.sin((coin.angle + Math.PI / 2) % Math.PI) - 3.2)
coin.style.setProperty('--shine-bg-multiplier', -40 * (Math.cos((coin.angle + Math.PI / 2) % Math.PI) - 0.5) + '%')
// Repeat animation loop
if (coin.moveLoopCount < coin.maxMoveLoopCount) {
if (coin.moveLoopCount === coin.maxMoveLoopCount - 6) button.classList.add('shrink-landing')
window.requestAnimationFrame(flipCoinLoop)
} else {
button.classList.add('coin-landed')
coin.style.setProperty('opacity', 0)
setTimeout(() => {
button.classList.remove('clicked', 'shrink-landing', 'coin-landed')
setTimeout(() => {
resetCoin()
}, 300)
}, 1500)
}
}
}) - 修改
_config.butterfly.yml,添加音频文件配置项,添加CDN配置项:1
2
3
4
5
6
7
8
9
10
11
12
13
14
15
16
17# Sponsor/reward
reward:
enable: true
+ coinAudio: https://npm.elemecdn.com/akilar-candyassets@1.0.16/audio/coin.mp3
QR_code:
。
。
。
CDN:
# main
main_css: /css/index.css
jquery: https://npm.elemecdn.com/jquery@latest/dist/jquery.min.js
main: /js/main.js
utils:/js/utils.js
+ # 打赏按钮投币效果
+ coin_js: /js/coin.js
+ coin_css: /css/coin.css - 现在的打赏按钮样式需要稍作适配,当前若提示语太长,悬停时会无法显示完全。需要微调一下,修改
[Blogroot]\themes\butterfly\source\css\_layout\reward.styl,整体替换为以下内容:还可以针对自己的情况适度调整以下内容:1
2
3
4
5
6
7
8
9
10
11
12
13
14
15
16
17
18
19
20
21
22
23
24
25
26
27
28
29
30
31
32
33
34
35
36
37
38
39
40
41
42
43
44
45
46
47
48
49
50
51
52
53
54
55
56
57
58
59
60
61
62
63
64
65
66
67
68
69
70
71.post-reward
position: relative
margin-top: 4rem
width: 100%
text-align: center
.reward-button
display: inline-block
padding: .2rem 1.2rem
background: var(--btn-bg)
color: var(--btn-color)
cursor: pointer
transition: all .4s
&:hover
box-shadow: inset 15em 0 0 0 var(--btn-hover-color)
.reward-main
display: block
.reward-main
position: absolute
bottom: 40px
left: -25%
z-index: 100
display: none
padding: 0 0 15px
width: 150%
.reward-all
display: inline-block
margin: 0
padding: 1rem .5rem
border-radius: 4px
background: var(--reward-pop)
&:before
position: absolute
bottom: -10px
left: 0
width: 100%
height: 20px
content: ''
&:after
position: absolute
right: 0
bottom: 2px
left: 0
margin: 0 auto
width: 0
height: 0
border-top: 13px solid var(--reward-pop)
border-right: 13px solid transparent
border-left: 13px solid transparent
content: ''
.reward-item
display: inline-block
padding: 0 8px
list-style-type: none
vertical-align: top
img
width: 130px
height: 130px
.post-qr-code-desc
padding-top: .4rem
width: 130px
color: $reward-pop-up-color- 修改悬停打赏按钮时的颜色填充长度:
1
2
3
4
5
6
7
8
9
10
11
.reward-button
display: inline-block
padding: .2rem 1.2rem
background: var(--btn-bg)
color: var(--btn-color)
cursor: pointer
transition: all .4s
&:hover
- box-shadow: inset 9em 0 0 0 var(--btn-hover-color)
+ box-shadow: inset 20em 0 0 0 var(--btn-hover-color) - 修改打赏二维码的样式(仅针对2张二维码的情况,单张不用改动。两张以上需要自己调试这两个参数)
1
2
3
4
5
6
7
8
9
10
.reward-main
position: absolute
bottom: 40px
- left: 0
+ left: -25%
z-index: 100
display: none
padding: 0 0 15px
- width: 100%
+ width: 150%
- 修改悬停打赏按钮时的颜色填充长度:
页脚振翅蝴蝶动效
点击查看页脚振翅蝴蝶动效魔改教程
本站页脚的振翅蝴蝶使用了iconfont的symbol引入方案,引入了彩色蝴蝶图标。因此使用本改动需要先学习前置教程: Hexo引入阿里矢量图标库。
- 引入相应的图标资源,修改
_config.butterfly.yml,在inject配置项添加图标库js。此处为我的图标库链接,掌握前置教程后可以改成自己的。1
2
3
4
5
6inject:
head:
- <link rel="stylesheet" href="/css/custom.css" media="defer" onload="this.media='all'"> #教学用样式
bottom:
# 阿里矢量图标
- <script async src="//at.alicdn.com/t/font_2032782_8ns648avijk.js"></script> - 新建
[Blogroot]\themes\butterfly\source\css\custom.css,在里面添加图标默认样式和振翅蝴蝶动画。1
2
3
4
5
6
7
8
9
10
11
12
13
14
15
16
17
18
19/*iconfont默认样式*/
.icon {
width: 1em; height: 1em;
vertical-align: -0.15em;
fill: currentColor;
overflow: hidden;
}
/* 页脚蝴蝶振翅动画 */
.copyright svg{
animation:butterfly 1s linear infinite alternate;
}
@keyframes butterfly {
from {
transform:rotateY(70deg);
}
to {
transform:rotateY(0deg);
}
} - 修改
[Blogroot]\themes\butterfly\layout\includes\footer.pug,1
2
3
4
5
6
7
8
9
10
11
12
13
14
15
16
17
18
19
20#footer-wrap
if theme.footer.owner.enable
- var now = new Date()
- var nowYear = now.getFullYear()
- if theme.footer.owner.since && theme.footer.owner.since != nowYear
- .copyright!= `©${theme.footer.owner.since} - ${nowYear} By ${config.author}`
- else
- .copyright!= `©${nowYear} By ${config.author}`
+ if theme.footer.owner.since && theme.footer.owner.since != nowYear
+ .copyright
+ span!= `©${theme.footer.owner.since} - ${nowYear}`
+ svg(style="width:1.5em; height:1.5em" aria-hidden="true")
+ use(xlink:href="#icon-Butterfly")
+ span!= `${config.author}`
+ else
+ .copyright
+ span!= `©${nowYear}`
+ svg(style="width:1.5em; height:1.5em" aria-hidden="true")
+ use(xlink:href="#icon-Butterfly")
+ span!= `${config.author}` - 事实上直接用
emoji的🦋,配合fontawesome-animation也能做到类似效果,甚至还可以使用base64的图片,但是图标呈现的不论是色彩还是动效都不如用iconfont来的漂亮。这里的动画用到了rotateY,三维上其实是图标在绕着Y轴旋转,降维到二维以后就呈现出了对折振翅的效果,但是人脑是很神奇的,因为左右半脑的发达程度不均,有的人还是能看到蝴蝶其实是在旋转而不是振翅。当然也不乏切换自如的人才。这个就只能仁者见仁智者见智了。
封面节日挂件效果
点击查看封面节日挂件效果魔改
本站封面节日挂件效果使用了iconfont的symbol引入方案,引入了彩色节日图标。因此使用本改动需要先学习前置教程: Hexo引入阿里矢量图标库。
- 新建
[Blogroot]\themes\butterfly\scripts\festival.js,1
2
3
4
5
6
7
8
9
10
11
12
13
14
15
16
17hexo.extend.helper.register('getFestivalIcon', function () {
var icon = [
'#icon-qiandai',
'#icon-denglong',
'#icon-juanzhou',
'#icon-hongbao',
'#icon-duilian',
'#icon-bianpao',
'#icon-shanzi',
'#icon-tangguo',
'#icon-yuanbao',
'#icon-qianchuan',
'#icon-denglong2'
]
var index = Math.floor(Math.random()*icon.length);
return icon[index]
}); - 修改
[Blogroot]\themes\butterfly\layout\includes\mixins\post-ui.pug,1
2
3
4
5
6
7
8
9if post_cover && theme.cover.index_enable
.post_cover(class=leftOrRight)
a(href=url_for(link) title=title)
+ svg.icon.festival-decoration(aria-hidden="true")
+ use(xlink:href=getFestivalIcon())
if theme.lazyload.enable
img.post_bg(data-lazy-src=url_for(post_cover) onerror=`this.onerror=null;this.src='`+ url_for(theme.error_img.post_page) + `'` alt=title)
else
img.post_bg(src=url_for(post_cover) onerror=`this.onerror=null;this.src='`+ url_for(theme.error_img.post_page) + `'` alt=title) - 新建
[Blogroot]\themes\butterfly\source\css\custom.css,1
2
3
4
5
6
7
8
9
10
11
12
13
14
15
16
17
18
19
20
21
22
23
24
25
26
27
28
29
30
31svg.icon.festival-decoration {
width: 3em;
height: 3em;
left: 2em;
margin-bottom: -3em;
display: block;
z-index: 100;
position: relative;
-webkit-animation: sway 1s infinite ease-in-out alternate;
animation: sway 1s infinite ease-in-out alternate;
}
@-webkit-keyframes sway {
0% {
-webkit-transform: rotate(20deg);
transform-origin: center top;
}
100% {
-webkit-transform: rotate(-20deg);
transform-origin: center top;
}
}
@keyframes sway {
0% {
transform: rotate(20deg);
transform-origin: center top;
}
100% {
transform: rotate(-20deg);
transform-origin: center top;
}
} - 修改
_config.butterfly.yml的inject配置项,引入custom.css和iconfont的js,此处为我的图标库链接,熟练掌握前置教程后可以换成自己的:1
2
3
4
5
6
7# 插入代码到头部 </head> 之前 和 底部 </body> 之前
inject:
head:
- <link rel="stylesheet" href="/css/custom.css" media="defer" onload="this.media='all'"> #教学用样式
bottom:
# 阿里矢量图标
- <script async src="//at.alicdn.com/t/font_2032782_ev6ytrh30f.js"></script>
每页单独配置背景图
点击查看每页单独配置背景图教程
Butterfly使用id为web_bg的div(以下简称#web_bg)来挂载背景图片,而背景图片是使用的#web_bg的background属性来配置,所以只需要改动这个css属性就可以。例如直接在md页面加入这样一条自定义样式:
1 | {% raw %} |
而更好的方案自然是在front-matter中通过新增一个background配置项来配置页面背景。基于这一思路,我们可以考虑在内联样式中添加参数。因为内联样式的权重本来就比外链高,所以不需要再在内联样式中加!important来提高权重了。
- 修改
[Blogroot]\themes\butterfly\layout\includes\layout.pug,1
2
3
4
5
6if theme.background
- #web_bg
+ if page.background
+ #web_bg(style=`background:`+ page.background + `;background-attachment: local;background-position: center;background-size: cover;background-repeat: no-repeat;`)
+ else
+ #web_bg - 如此即可在每个页面的
markdown文件的front-matter中使用background配置项单独配置页面背景了,不写或留空则使用主题配置文件中的默认背景。1
2
3
4
5
6
7---
title: 糖果屋微调合集
top_img:
cover: 'https://npm.elemecdn.com/akilar-candyassets/image/20201115152231.png'
background: url(https://npm.elemecdn.com/akilar-candyassets/image/index.webp)
description: 将本站针对butterfly主题的亿点点小改动做个集锦。
--- - 感谢@Toxic的反馈,开了pjax的用户会发现背景变了以后就变不回去了,需要刷新才行。因此为了实现期望的效果,这里还要再把
#web_bg加到pjax选择器中。
修改[Blogroot]\themes\butterfly\layout\includes\third-party\pjax.pug,1
2
3
4
5
6
7
8
9
10
11script(src=url_for(theme.CDN.pjax))
script.
let pjaxSelectors = [
'title',
'#config-diff',
'#body-wrap',
'#rightside-config-hide',
'#rightside-config-show',
+ '#web_bg',
'.js-pjax'
]
配置手机PC页面白天黑夜共四个背景图
点击查看配置手机PC页面白天黑夜共四个背景图教程
因为本改法同样是使用!important提高权重的方式来改变当前页面背景。所以会和上方的每页单独配置背景图存在一定冲突,具体表现为定义了单页背景的页面不会再应用默认的四个页面。建议两个方案二选一。(本帖没有给出两种方案的融合写法,因为真的非常不推荐您这么做)
- 首先是PC端的白天黑夜双背景,修改
[Blogroot]\themes\butterfly\layout\includes\layout.pug,1
2
3
4
5
6
7
8
9
10
11
12
13
14
15
16
17
18
19
20
21
22+ - var DefaultBg = page.defaultbg ? page.defaultbg : theme.background.default
+ - var DDMBg = theme.background.darkmode ? theme.background.darkmode : DefaultBg
+ - var DarkmodeBg = page.darkmodebg ? page.darkmodebg : DDMBg
if theme.background
#web_bg
+ if page.defaultbg || page.darkmodebg
+ style.
+ #web_bg{
+ background: #{DefaultBg} !important;
+ background-attachment: local!important;
+ background-position: center!important;
+ background-size: cover!important;
+ background-repeat: no-repeat!important;
+ }
+ [data-theme="dark"]
+ #web_bg{
+ background: #{DarkmodeBg} !important;
+ background-attachment: local!important;
+ background-position: center!important;
+ background-size: cover!important;
+ background-repeat: no-repeat!important;
+ }1
2
3
4
5
6
7
8
9
10
11
12
13
14
15
16
17
18
19
20
21
22- var DefaultBg = page.defaultbg ? page.defaultbg : theme.background.default
- var DDMBg = theme.background.darkmode ? theme.background.darkmode : DefaultBg
- var DarkmodeBg = page.darkmodebg ? page.darkmodebg : DDMBg
if theme.background
#web_bg
if page.defaultbg || page.darkmodebg
style.
#web_bg{
background: #{DefaultBg} !important;
background-attachment: local!important;
background-position: center!important;
background-size: cover!important;
background-repeat: no-repeat!important;
}
[data-theme="dark"]
#web_bg{
background: #{DarkmodeBg} !important;
background-attachment: local!important;
background-position: center!important;
background-size: cover!important;
background-repeat: no-repeat!important;
} - 再是实现手机端的白天黑夜双背景,在
[Blogroot]\themes\butterfly\source\css\_layout目录下新建一个web-bg.styl文件,写入以下内容:1
2
3
4
5
6
7
8
9
10
11
12
13
14
15
16
17
18
19
20
21
22
23
24$web-bg-night = hexo-config('background.darkmode') ? unquote(hexo-config('background.darkmode')) : $web-bg
$mobile-bg-day = hexo-config('background.mobileday') ? unquote(hexo-config('background.mobileday')) : $web-bg
$mobile-bg-night = hexo-config('background.mobilenight') ? unquote(hexo-config('background.mobilenight')) : $web-bg-night
[data-theme="dark"]
#web_bg
background: $web-bg-night
background-attachment: local
background-position: center
background-size: cover
background-repeat: no-repeat
@media screen and (max-width: 800px)
#web_bg
background: $mobile-bg-day !important
background-attachment: local !important
background-position: center !important
background-size: cover !important
background-repeat: no-repeat !important
[data-theme="dark"]
#web_bg
background: $mobile-bg-night !important
background-attachment: local !important
background-position: center !important
background-size: cover !important
background-repeat: no-repeat !important - 然后还要修改一下
[Blogroot]\themes\butterfly\source\css\var.styl,大约35行的位置1
2
3
4$text-line-height = 2
- $web-bg = hexo-config('background') && unquote(hexo-config('background'))
+ $web-bg = hexo-config('background.default') && unquote(hexo-config('background.default'))
$index_top_img_height = hexo-config('index_top_img_height') ? convert(hexo-config('index_top_img_height')) : 100vh - 最后我们再修改一下配置项,在
[Blogroot]/_config.butterfly.yml中找到background配置项,内容改为:1
2
3
4
5
6
7
8# Website Background (設置網站背景)
# can set it to color or image (可設置圖片 或者 顔色)
# The formal of image: url(http://xxxxxx.com/xxx.jpg)
background:
default: #【必选】默认背景
darkmode: #【可选】PC端夜间模式背景
mobileday: #【可选】移动端日间默认背景
mobilenight: #【可选】移动端夜间模式背景 - 感谢@Toxic的反馈,开了pjax的用户会发现背景变了以后就变不回去了,需要刷新才行。因此为了实现期望的效果,这里还要再把
#web_bg加到pjax选择器中。
修改[Blogroot]\themes\butterfly\layout\includes\third-party\pjax.pug,1
2
3
4
5
6
7
8
9
10
11script(src=url_for(theme.CDN.pjax))
script.
let pjaxSelectors = [
'title',
'#config-diff',
'#body-wrap',
'#rightside-config-hide',
'#rightside-config-show',
+ '#web_bg',
'.js-pjax'
]
菜单栏多色图标配置教程
现在的iconfont可以在图标库的项目设置里直接打开彩色设置,然后采用fontclass的引用方式即可使用多彩图标。但是单一项目彩色图标上限是40个图标,相比之下symbol引入方案依然是最优解。
详情参看Hexo引入阿里矢量图标库-iconfont inject
点击查看菜单栏多色图标配置教程
部分客人在看完iconfont引入教程以后都试着将菜单栏改成iconfont图标,但是只能使用fontclass引入方案配合自定义css来实现单一彩色图标。而无法使用symbol引入方案。这是因为symbol引入方案和fontclass引入方案是基于不同原理,前者实质是一个svg,而后者实质是一个字体。为了能够实现symbol引入,毫无疑问是需要改动源码的。
- 本方案中,通过二重判断,可以同时兼容
fontawesome写法和iconfont的symbol写法,但是因为判断基准是基于开头是fa还是icon,所以若要使用iconfont的fontclass写法,就需要写成fa icon-xxx了。有symbol了真的还有人会继续用fontclass吗?不会吧!不会吧! - 因为
butterfly_v3.7.0改动了menu_item.pug的基本结构,所以本方案不兼容低于Butterfly_v3.7.0的主题版本。可以在熟读教程的情况下自主适配低版本,或者根据最新版主题的menu_item.pug进行局部升级。(事实上可以把menu_item.pug全部代码改成和本帖一样,同时配置项也沿用本帖的即可)
店长的碎碎念
其实原本fontawesome写法是不需要加双竖线来分割的。但是为了统一格式使得观感良好,这里特地加了一行代码。看起来有画蛇添足之嫌,却让最终的配置项显得和谐一些。
整个开发过程其实就是一种妥协。如果想要兼容所有的写法,就需要写更多的判断机制,对我来说是得不偿失的。
另外我并不喜欢在menu-item里使用symbol方案的iconfont图标,因为它很难做夜间模式适配,只能通过filter滤镜属性来改写明暗对比度。单纯的反色就好像负片一样,效果一言难尽。只能说是尽量在一开始选择图标的时候就考虑好背景的明暗变化。或者干脆在夜间模式时给他加个泛光阴影底色效果。
Social卡片彩色图标引入
现在的iconfont可以在图标库的项目设置里直接打开彩色设置,然后采用fontclass的引用方式即可使用多彩图标。但是单一项目彩色图标上限是40个图标,相比之下symbol方案依然是最优解。
详情参看Hexo引入阿里矢量图标库-iconfont inject
点击查看Social卡片彩色图标引入教程
代码原理和上面的菜单栏基本一致。所以各个前置教程都不再重复。这里只提供代码魔改内容和配置项编写方案。
首页页码样式调整
点击查看首页页码样式调整教程
本魔改方案是基于Butterfly_v4.1.0进行修改,考虑到v4.0开始首页的按钮样式配色已经做了修改。旧版可能不兼容。
在进行本帖更改前,我已经对文章内的页码做了修改,详情参考“butterfly文章页面上下篇按钮UI调整”,所以不保证普适性。
在进行本项魔改前,请务必做好文件备份方便回退。
- 修改
[Blogroot]\themes\butterfly\source\css\_layout\pagination.styl,将整个文件替换成以下内容,不保证魔改普适性,请务必记得做好文件备份方便回退!开头为效果配色,可以自行调整成适合自己的。1
2
3
4
5
6
7
8
9
10
11
12
13
14
15
16
17
18
19
20
21
22
23
24
25
26
27
28
29
30
31
32
33
34
35
36
37
38
39
40
41
42
43
44
45
46
47
48
49
50
51
52
53
54
55
56
57
58
59
60
61
62
63
64
65
66
67
68
69
70
71
72
73
74
75
76
77
78
79
80
81
82
83
84
85
86
87
88
89
90
91
92
93
94
95
96
97
98
99
100
101
102
103
104
105
106
107
108
109
110
111
112
113:root
--pagenumber-color: #ffffff
--pagenumber-current-color: rgba(153, 54, 44,0.8)
--pagenumber-current-shadow-color: #572020
--pagenumber-hover-color: rgba(153, 54, 44,0.8)
--pagenumber-background-color: rgba(80, 80,80, 0.85)
[data-theme="dark"]
--pagenumber-color: #ffffff
--pagenumber-current-color: #1E7EE2
--pagenumber-current-shadow-color: #104477
--pagenumber-hover-color: #1E7EE2
--pagenumber-background-color: rgba(50, 50, 50, 0.85)
#pagination
font-family: 'UnidreamLED','TaikoMagic';
.pagination
margin-top: 20px
text-align: center
position: relative;
a
color: var(--pagenumber-color)
&::after
content ''
position absolute
width 100%
height 35px
left 0
bottom 0
z-index -1
background-image linear-gradient(to right, rgba(0, 0, 0, 0) 0%, var(--pagenumber-background-color) 40%, var(--pagenumber-background-color) 50%, var(--pagenumber-background-color) 60%, rgba(0, 0, 0, 0) 100%)
.page-number
position: relative;
&.current
background var(--pagenumber-current-color)
color var(--pagenumber-color)
padding: 9px 3px 0px 3px;
height: 40px;
&:before
content: '';
position: absolute;
top: -10px;
left: -10px
width: 30px;
border: 10px solid transparent;
border-bottom: 7px solid var(--pagenumber-current-shadow-color);
z-index: -1;
&:hover
&::after
display none
.layout
.pagination
z-index: 20
& > *
display: inline-block
margin: 0 6px
min-width: 30px
width: auto
height: 35px
line-height: 30px
padding: 4px 3px 0px 3px;
& > *:not(.space)
&:hover
background: var(--pagenumber-hover-color)
color: var(--pagenumber-color)
.pagination-info
position: absolute
top: 50%
padding: 20px 40px
width: 100%
transform: translate(0, -50%)
.prev_info,
.next_info
@extend .limit-one-line
color: var(--white)
font-weight: 500
.next-post
.pagination-info
text-align: right
.pull-full
width: 100%
.prev-post .label,
.next-post .label
color: var(--light-grey)
text-transform: uppercase
font-size: 90%
.prev-post,
.next-post
@extend .postImgHover
width: 50%
+maxWidth768()
width: 100%
a
position: relative
display: block
overflow: hidden
height: 150px
&.pagination-post
overflow: hidden
margin-top: 40px
width: 100%
background: $dark-black

Use this card to join the candyhome and participate in a pleasant discussion together .
Welcome to Akilar's candyhome,wish you a nice day .


[Blogroot]\themes\butterfly\layout\includes\header\social.pug,替换为以下代码:social配置项。写法沿用menu_item的写法示例。早就想吐槽butterfly里menu和social截然相反的配置项写法了。修改[Blogroot]\_config.butterfly.yml的social配置项。[Blogroot]\themes\butterfly\layout\includes\header\social.pug,替换为以下代码:social配置项。写法沿用menu_item的写法示例。早就想吐槽butterfly里menu和social截然相反的配置项写法了。修改[Blogroot]\_config.butterfly.yml的social配置项。