点开查看开发记录
开发记录
2020-12-11:正式版v1.0
- 参考阿里矢量图标样式教程,引入图标。
- 修改
article-sort.pug,给时间轴新增生肖图标。
2020-12-12:正式版v1.01
- 新增阿里矢量图标彩色图标引入方案。
- 同步修改,将时间轴图标也改成彩色。
2020-12-13:正式版v1.02
- 修复与
Butterfly的note标签样式冲突的bug。
参考内容
- hexo给next模版归档页面年份后面增加十二生肖图标
大概是最近写的最短的教程了,主要是引入图标的方案都已经写在另一篇教程里了
魔改步骤
旧版方案(纯色图标)
在
[Blogroot]\themes\butterfly\scripts\目录下新建year.js,并在[Blogroot]\themes\butterfly\scripts\year.js中输入以下内容:1
2
3
4
5
6
7
8
9
10
11
12
13
14
15
16
17
18hexo.extend.helper.register('getAnimalIcon', function (year) {
var index = parseInt(year) % 12;
var icon = {
0: 'icon-monkey',
1: 'icon-rooster',
2: 'icon-dog',
3: 'icon-boar',
4: 'icon-rat',
5: 'icon-ox',
6: 'icon-tiger',
7: 'icon-rabbit',
8: 'icon-dragon',
9: 'icon-snake',
10: 'icon-horse',
11: 'icon-goat',
}
return icon[index]
});引入相应的阿里矢量图标库的图标,在
[Blogroot]\themes\butterfly\source\css\目录下新建year.css,打开[Blogroot]\themes\butterfly\source\css\year.css并输入以下内容:1
2
3
4
5
6
7
8
9
10
11
12
13
14
15
16
17
18
19
20
21
22
23
24
25
26
27
28
29
30
31
32
33
34
35
36
37
38
39
40
41
42
43
44
45
46
47
48
49
50
51
52
53
54
55
56
57
58
59@import url("//at.alicdn.com/t/font_2264842_3izu8i5eoc2.css");
/* 这是我的阿里矢量图标库的引入链接,里面存放了十二生肖的图标 */
.iconfont {
font-family: "iconfont" ;
font-size: 1.85em;
/* 可以定义图标大小 */
font-style: normal;
-webkit-font-smoothing: antialiased;
-moz-osx-font-smoothing: grayscale;
}
/* 生肖鼠 */
.icon-rat:before {
color: #85c3de;
/* 可以自定义图标颜色 */
}
/* 生肖牛 */
.icon-ox:before {
color: #ffaf6e;
}
/* 生肖虎 */
.icon-tiger:before {
color: #f7c768;
}
/* 生肖兔 */
.icon-rabbit:before {
color: #ffbdd8;
}
/* 生肖龙 */
.icon-dragon:before {
color: #ff8787;
}
/* 生肖蛇 */
.icon-snake:before {
color: #c3d686;
}
/* 生肖马 */
.icon-horse:before {
color: #ffaf6e;
}
/* 生肖羊 */
.icon-goat:before {
color: #f7c768;
}
/* 生肖猴 */
.icon-monkey:before {
color: #c3d686;
}
/* 生肖鸡 */
.icon-rooster:before {
color: #ff8787;
}
/* 生肖狗 */
.icon-dog:before {
color: #85c3de;
}
/* 生肖猪 */
.icon-boar:before {
color: #ffbdd8;
}修改
[Blogroot]\themes\butterfly\layout\includes\mixins\article-sort.pug,第7行开始,注意缩进。1
2
3
4
5
6
7
8
9
10- let title = article.title || _p('no_title')
+ - let animalIcon = getAnimalIcon(tempYear)
if tempYear !== year
- year = tempYear
- .article-sort-item.year= year
+ .article-sort-item.year
+ span= year
+ i.iconfont(class=animalIcon)
.article-sort-item(class=no_cover)
if article.cover && theme.cover.archives_enable- 修改
[Blogroot]\_config.butterfly.yml的inject配置项,引入year.css:1
2
3
4inject:
head:
+ - <link rel="stylesheet" href="/css/year.css" media="defer" onload="this.media='all'">
bottom: 运行
hexo clean && hexo g以后即可看到效果。拓展内容

方案中第1步和第2步的图标名称有对应关系。如果需要自定义图标,记得修改这两步中的对应内容。
</div>
新版方案使用阿里矢量图标的symbol引入方案,为彩色图标。
在
[Blogroot]\themes\butterfly\scripts\目录下新建year.js,并在[Blogroot]\themes\butterfly\scripts\year.js中输入以下内容:1
2
3
4
5
6
7
8
9
10
11
12
13
14
15
16
17
18hexo.extend.helper.register('getAnimalIcon', function (year) {
var index = parseInt(year) % 12;
var icon = {
0: 'icon-monkey',
1: 'icon-rooster',
2: 'icon-dog',
3: 'icon-boar',
4: 'icon-rat',
5: 'icon-ox',
6: 'icon-tiger',
7: 'icon-rabbit',
8: 'icon-dragon',
9: 'icon-snake',
10: 'icon-horse',
11: 'icon-goat',
}
return icon[index]
});在
[Blogroot]\_config.butterfly.yml的inject配置项中填入我的生肖图标线上链接,并引入自定义css文件(没有custom.css文件的可以自己新建一个[Blogroot]\themes\butterfly\source\css\custom.css):1
2
3
4
5inject:
head:
+ - <link rel="stylesheet" href="/css/custom.css" media="defer" onload="this.media='all'">
bottom:
+ - <script async src="//at.alicdn.com/t/font_2264842_3izu8i5eoc2.js"></script>此处
async是异步加载属性,能够减少HTML阻塞。打开
[Blogroot]\themes\butterfly\source\css\custom.css,输入以下内容:1
2
3
4
5
6
7
8svg.icon {
/* 这里定义svg.icon,避免和Butterfly自带的note标签冲突 */
width: 1em; height: 1em;
/* width和height定义图标的默认宽度和高度*/
vertical-align: -0.15em;
fill: currentColor;
overflow: hidden;
}修改
[Blogroot]\themes\butterfly\layout\includes\mixins\article-sort.pug,第7行开始,注意缩进。1
2
3
4
5
6
7
8
9
10
11- let title = article.title || _p('no_title')
+ - let iconAnimal = '#'+ getAnimalIcon(tempYear)
if tempYear !== year
- year = tempYear
- .article-sort-item.year= year
+ .article-sort-item.year
+ span= year
+ svg.icon(aria-hidden='true')
+ use(xlink:href=iconAnimal)
.article-sort-item(class=no_cover)
if article.cover && theme.cover.archives_enable运行
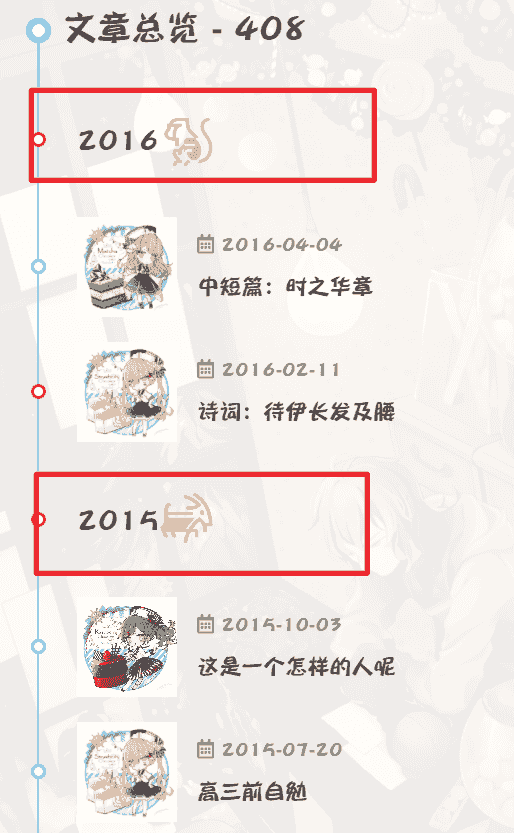
hexo clean && hexo g以后即可看到效果。- 图标预览
拓展内容
如果不想用本教程的生肖图标,也可以自由替换。阿里矢量图标的添加和引入方案可以参考站内教程:
方案中第1步和第2步的图标名称有对应关系。如果需要自定义图标,记得修改这两步中的对应内容。

Use this card to join the candyhome and participate in a pleasant discussion together .
Welcome to Akilar's candyhome,wish you a nice day .