点击查看更新记录
更新记录
2022-02-22:报错归纳
- 感谢安知鱼的反馈。
- 归纳可能遇到的报错。
2022-01-17:教程起草
- 编写参考教程
- 解决.github无法通过hexo deploy推送的问题
- 弃用新增npm插件的方案。改为直接使用本地新建scripts
- 绘制流程图
点击查看参考教程
| 参考方向 | 教程原贴 |
|---|---|
| 参考了小康的博文中,关于解决hexo deploy无法提交.github文件夹至博客部署仓库的办法。 | hexo 博客每天定时提交网址给百度 |
| 参考了hexo的生成器的API写法 | HEXO-API-生成器(Generator) |
思路讲解
点击展开思路讲解
自从2021年12月20日,jsdelivr因为“某些原因”,在大陆和台湾的ICP证书被吊销。可以说,这让国内的开发生态瞬间天塌一般。目前,虽然jsdelivr已经恢复了服务,但是这只是通过在“中国附件”的节点提供的CDN加速服务,速度上还不如放到本地。这种反向加速的CDN服务,我们已经可以认为jsdelivr已经挂了。
在这一背景下,寻求新的,重点是免费的CDN加速服务,就成了当前最迫切的事情。幸运的是,虽然jsdelivr挂了,但是npm依然有大量的镜像节点可以使用,关于此项内容可以参考本站的另一篇教程:

那么,新的问题又出现了新的风暴已经出现,怎么能够停滞不前,众所周知,jsdelivr存在两个加速分支,
- 一个是
https://npm.elemecdn.com/package@version/file, - 一个是
https://cdn.jsdelivr.net/gh/user/repo@version/file,
前者可以通过用npm的其他镜像节点加速来解决,但后者就没有这么多加速节点可以使用了。
虽然也有很多同学尝试通过服务器自建反代jsdelivr来恢复访问速度,可是先抛开反向代理所需的知识点不谈,依赖于服务器的操作一开始就已经为这一方案设立了门槛。
本文尝试通过github action配合自动打包username.github.io仓库至npm。鉴于传统的hexo deploy方案并不能达成这一目的,所以这里推荐各位先完成github action自动部署的配置。
推荐阅读前置教程
因为传统的hexo deploy无法将.github文件夹也一并提交至部署仓库,所以需要用git提交流程来完成站点内容部署。而指令相比hexo deploy较为繁琐,故而推荐使用github action来完成。当然实在不想配置github action的,可以在本地留个自动提交脚本。最终也能实现提交流程的。具体内容会在教程内表述。
以下推荐两篇前置教程,事先完成这两篇教程里的配置,有利于您更好的理解下方本篇教程的主干内容。
- 此篇为配置Github Action的教程,完成后可以实现hexo线上部署,非常推荐学习。
- 此篇虽然名为图床技巧,但实际上是对npm发包的流程讲解,同时罗列一些npm的镜像节点,完成学习后有利于您更好的理解本文。
流程图
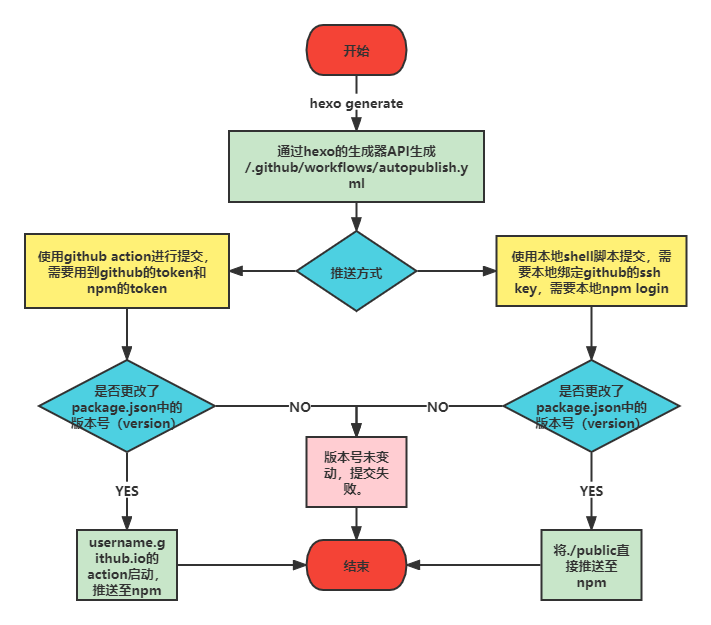
具体操作步骤
- 新建
[Blogroot]\scripts\npmpublish.js,使用hexo的生成器API生成npm自动推送action脚本。这一步是因为默认的hexo generate指令并不会将source目录下的.github文件夹编译到public文件夹下,所以必须要用生成器来生成。1
2
3
4
5
6
7
8
9
10
11
12
13
14
15
16
17
18
19
20
21
22
23
24
25hexo.extend.generator.register('npmpush', function(locals){
// Object
return {
path: '/.github/workflows/autopublish.yml',
data: `name: Node.js Package
# 监测分支,2020年10月后github新建仓库默认分支改为main,记得更改
on:
push:
branches:
- master
jobs:
publish-npm:
runs-on: ubuntu-latest
steps:
- uses: actions/checkout@v2
- uses: actions/setup-node@v1
with:
node-version: "12.x"
registry-url: https://registry.npmjs.org/
- run: npm publish
env:
NODE_AUTH_TOKEN: `+ '${{secrets.npm_token}}'
};
}); - 因为直接使用hexo deploy无法推送
public文件夹中的.github文件夹至博客部署仓库username.github.io,所以此处需要我们手动提交。推荐使用ssh链接,这样可以避免反复输入github的账号和密码。1
2
3
4
5
6
7cd ./public
git init
git config --global user.name 'name'
git config --global user.email 'example@example.com'
git add .
git commit -m 'updated'
git push --force --all git@github.com:username/username.github.io.git #强制提交至github1
2
3
4
5
6
7cd ./public
git init
git config --global user.name 'akilarlxh'
git config --global user.email 'akilarlxh@gmail.com'
git add .
git commit -m 'updated'
git push --force --all git@github.com:Akilarlxh/Akilarlxh.github.io.git #强制提交至github 故此,未配置
github action的可以通过新建一个自动提交脚本[Blogroot]\autopublish.sh,其他指令可以自己考虑加。这样一来,每次通过双击这个提交脚本就可以完成提交了。1
2
3
4
5
6
7
8
9hexo clean
hexo generate
cd ./public
git init
git config --global user.name 'name'
git config --global user.email 'example@example.com'
git add .
git commit -m 'updated'
git push --force --all git@github.com:username/username.github.io.git #强制提交至github
1
2
3
4
5
6
7
8
9
10
11hexo clean
hexo bangumi -u
hexo generate
gulp
cd ./public
git init
git config --global user.name 'akilarlxh'
git config --global user.email 'akilarlxh@gmail.com'
git add .
git commit -m 'updated'
git push --force --all git@github.com:Akilarlxh/Akilarlxh.github.io.git #强制提交至github使用了
github action的,首先需要用到github的token,如果之前配置action的时候用到的token还记得的话可以拿来复用:
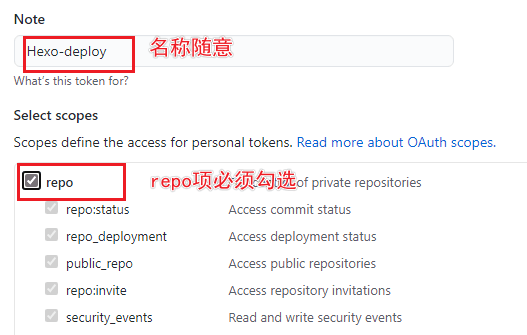
访问Github->头像(右上角)->Settings->Developer Settings->Personal access tokens->generate new token,创建的Token名称随意,但必须勾选repo项和workflow项。(图是用的github action教程的旧图,这次需要勾选workflow。否则会报错误。)
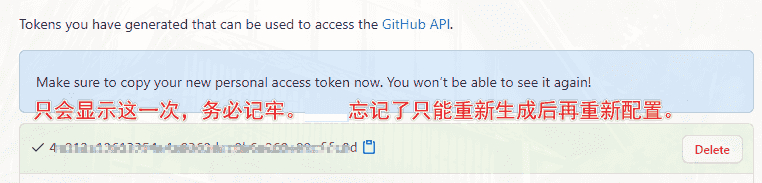
token只会显示这一次,之后将无法查看,所以务必保证你已经记录下了Token。之后如果忘记了就只能重新生成重新配置了。- 因为直接使用hexo deploy无法推送
public文件夹中的.github文件夹至博客部署仓库username.github.io,所有此处我们需要更改autopublish.yml中关于hexo deploy部分的指令内容。以本站的教程为例,需要更改部署部分的指令内容:1
2
3
4
5
6
7
8
9
10
11
12
13- name: 部署到Github
run: |
- git config --global user.name 'name'
- git config --global user.email 'example@example.com'
- git clone https://github.com/username/username.github.io.git .deploy_git
- hexo deploy
+ cd ./public
+ git init
+ git config --global user.name 'name'
+ git config --global user.email 'example@example.com'
+ git add .
+ git commit -m 'updated by github action'
+ git push --force --all https://[token]@github.com/username/username.github.io1
2
3
4
5
6
7
8
9
10
11
12- name: 部署到Github
run: |
# git config --global user.name "akilarlxh"
# git config --global user.email "akilarlxh@gmail.com"
# git clone https://github.com/Akilarlxh/Akilarlxh.github.io.git .deploy_git
cd ./public
git init
git config --global user.name 'akilarlxh'
git config --global user.email 'akilarlxh@gmail.com'
git add .
git commit -m 'updated by github action'
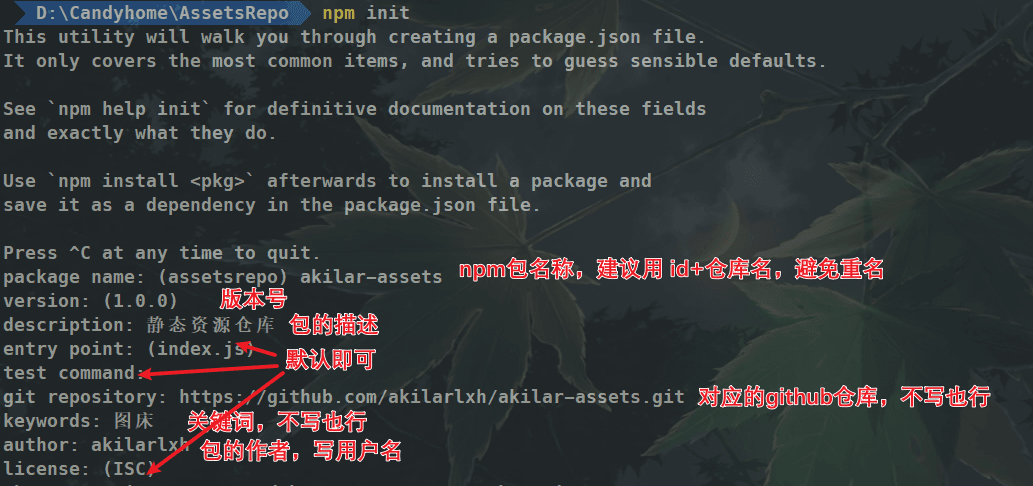
git push --force --all https://1407sadagh4rixzf9343245834dafrdfb13a4856sa2babf2@github.com/Akilarlxh/Akilarlxh.github.io - 提交前,需要在source目录下先初始化一下npm包,在
[Blogroot]\source\目录下打开终端,输入然后输入你的博客包的主要信息。1
npm init
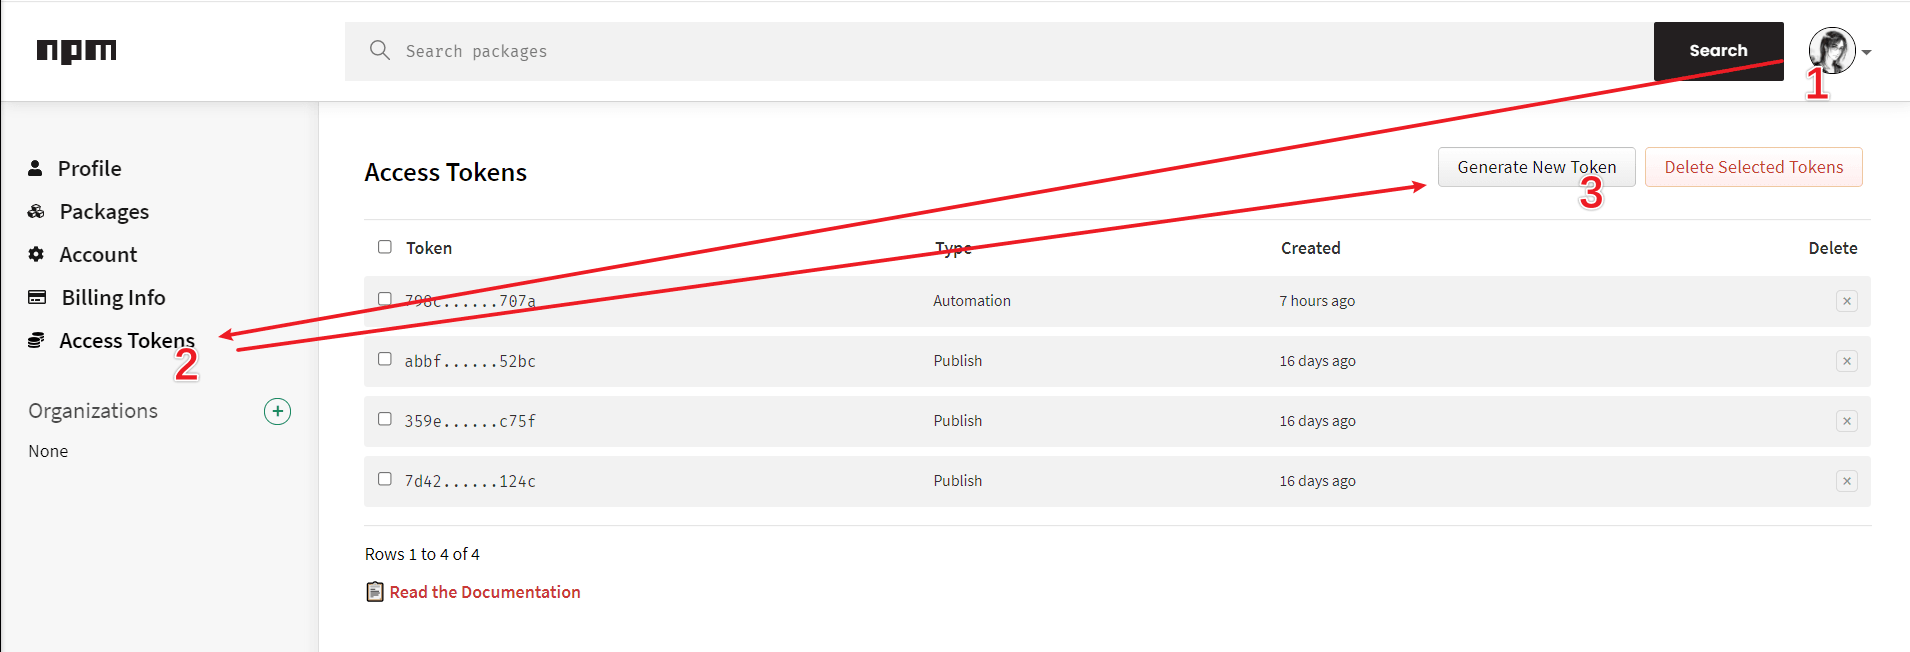
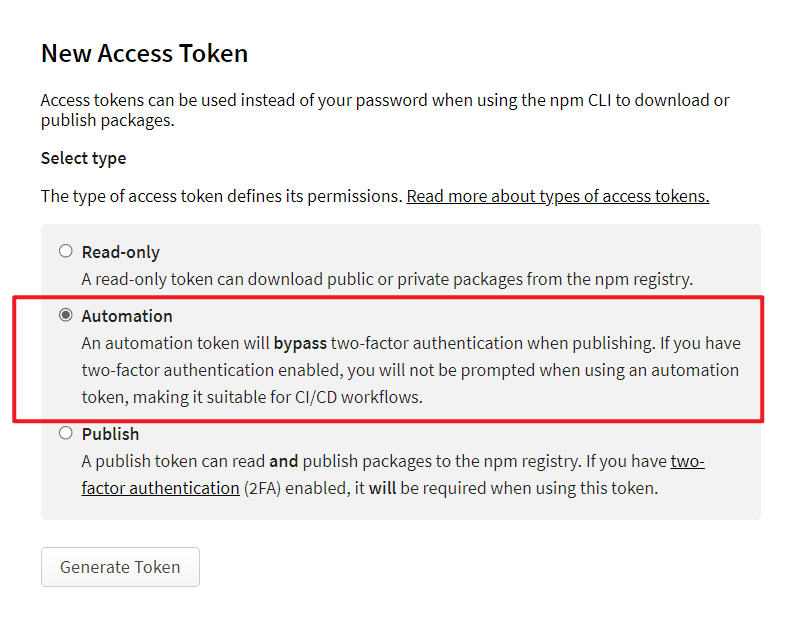
最后会输出一段package.json,请求确认,输入yes即可。 - 在npm官网->头像->Access Tokens->Generate New Token,勾选Automation选项,
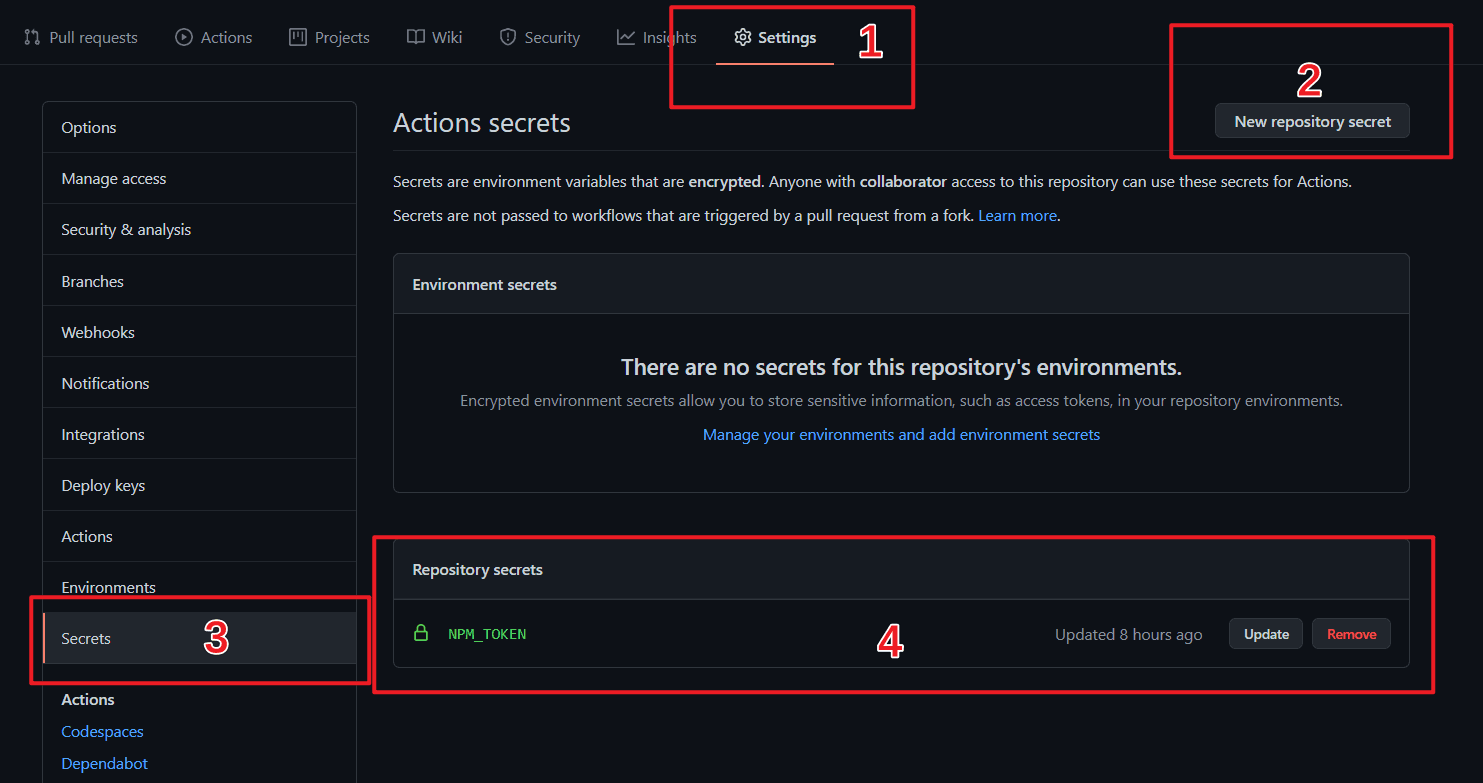
Token只会显示这一次,之后如果忘记了就只能重新生成重新配置了。 - 在github的博客部署仓库(
username.github.io)设置项里添加一个名为NPM_TOKEN的secrets,把获取的Npm的Access token输入进去。 - 此处利用npm提交必须要更改package.json里的版本号才能顺利提交新版本的特性,我们可以手动更改
[Blogroot]\source\package.json中的version,从而避免每次提交就发布一个版本,导致版本号泛滥的问题。 - 这里有一个小技巧,因为github和npm都多少有对包的大小上限有做限制,那么,我们可以通过新建
.npmignore,在里面写下我们不需要提交到npm包中的内容,比如不要传最占地方的index.html文件,来最大限度的精简最终包的大小。当然,如果有野心通过service-worker实现全站npm加速,那就没有这个问题了。- 试了下直接在source目录下新建还是不会读到public目录,没事,我们用老套路,用Hexo提供的generator API生成就是了。新建
[Blogroot]\scripts\npmignore.js,参考public目录下的文件目录,添加不想提交的目录。可以使用通配符。比如我不想提交所有的html文件。那就写**/*.html。1
2
3
4
5
6
7
8
9
10
11
12hexo.extend.generator.register('npmignore', function(locals){
// Object
return {
path: '/.npmignore',
data: `**/*.html
.github/
download/
ads.txt
CNAME
robots.txt
`};
});
- 试了下直接在source目录下新建还是不会读到public目录,没事,我们用老套路,用Hexo提供的generator API生成就是了。新建
- 欲发布新版本至npm时,先更改
[Blogroot]\source\package.json中的version,然后通过上述的github action或者本地提交shell脚本实现提交即可。 - 最后,就可以利用npm的CDN节点来加速我们博客的静态资源了。比如博客中的图片,
- 绝对路径:
[Blogroot]/source/img/image.jpg; - 在markdown中引用图片(相对路径):
; - 在markdown中引用图片(图床链接gh+jsd):
; - 在markdown中引用图片(图床链接npm+zhimg):
,其中akilar-blog是我的npm包名。
- 绝对路径:

可能遇到的报错
- 部署不成功,github action日志报错: ![remote rejected] master -> master (refusing to allow a Personal Access Token to create or update workflow )
.github/workflows/autopublish.ymlwithoutworkflowscope)- 这一问题是因为Token缺少workflow的操作权限,重新申请一条token,这次不要忘记勾选repo项和workflow项。
- 本地提交了,线上Action没有启动。
- 这一问题有两种可能,一个是你没有先修改
[Blogroot]/source/package.json,表现为action构建失败。第二种则是没有改动[Blogroot]\scripts\npmpublish.js中的脚本里的分支,2020年10月以后默认分支已经从master改为了main了。
- 这一问题有两种可能,一个是你没有先修改

Use this card to join the candyhome and participate in a pleasant discussion together .
Welcome to Akilar's candyhome,wish you a nice day .